Ubuntu on the raspberry pi 4
Содержание:
- Setup Wi-Fi and ssh for your Raspberry Pi 4 without a monitor
- Getting Ubuntu Server
- Performance
- Recommended Gear
- GPIO support
- Configuration file tweaks
- Conclusion
- Accelerated 3D graphics on Debian
- What to do next with Ubuntu MATE on your Raspberry Pi 3 B+
- Запись изображения на SD-карту
- GitHub Project Location
- Build Instructions
- Preinstalled Image Download / Instructions
- How to Install Ubuntu on Raspberry Pi
- Flash the image into a micro SD card
- First configuration steps for Ubuntu 20.04 on the Raspberry Pi
- What’s next
- Backup системы (с sd-карты)
- loop-mounting images
- How To Install Ubuntu To An SD Card
- First ssh connection to the Raspberry Pi 4
- Installing MicroK8s
Setup Wi-Fi and ssh for your Raspberry Pi 4 without a monitor
Great, now your micro SD card contains Ubuntu server for Raspberry Pi 4.
BUT, the configuration is not complete yet. As we won’t use any external monitor/keyboard/mouse we first need to configure the Wi-Fi directly from the SD card, and make sure we can ssh into it. Don’t worry though it will be quite easy.
So, put back your micro SD card into your computer.
Setup Wi-Fi directly from your SD card
Navigate inside the root folder of the card. The name should be something like “system-boot”.
Find the file named “network-config” and open it in a text editor. On Windows, you can right-click -> “open with” and select any text editor you want.
The file should contains this:
# This file contains a netplan-compatible configuration which cloud-init
# will apply on first-boot. Please refer to the cloud-init documentation and
# the netplan reference for full details:
#
# https://cloudinit.readthedocs.io/
# https://netplan.io/reference
#
# Some additional examples are commented out below

version: 2
ethernets:
  eth0:
    dhcp4: true
    optional: true
#wifis:
#  wlan0:
#    dhcp4: true
#    optional: true
#    access-points:
#      myhomewifi:
#        password: "S3kr1t"
#      myworkwifi:
#        password: "correct battery horse staple"
#      workssid:
#        auth:
#          key-management: eap
#          method: peap
#          identity: "me@example.com"
#          password: "passw0rd"
#          ca-certificate: /etc/my_ca.pem
Add your Wi-Fi name and password just after the ethernet configuration.
version: 2
ethernets:
  eth0:
    dhcp4: true
    optional: true
wifis:
  wlan0:
    dhcp4: true
    optional: true
    access-points:
      "YOUR_WIFI_NAME":
        password: "YOUR_WIFI_PASSWORD"
A few things to pay attention to:
- Make sure the indentation is exactly 2 spaces. No tab, no 4 spaces.
- Replace YOUR_WIFI_NAME with your actual Wi-Fi name. Keep the quotes “”.
- Replace YOUR_WIFI_PASSWORD with the password for the Wi-Fi. Keep the quotes “”.
- Of course, this Wi-Fi network should be the same as the one your computer is currently connected to, otherwise the rest of this tutorial won’t work.
Save the file and that’s it.
ssh setup
For ssh, you should not need to do anything.
If you go into the “user-data” file, also inside the root directory of your SD card, you should see:
...

# On first boot, set the (default) ubuntu user's password to "ubuntu" and
# expire user passwords
chpasswd:
  expire: true
  list:
  - ubuntu:ubuntu

# Enable password authentication with the SSH daemon
ssh_pwauth: true

...
So, we’ll be able to connect to the Pi via ssh, and we have the initial username and password: ubuntu:ubuntu.
Getting Ubuntu Server
64 bit (aarch64)
I have a custom compiled prebuilt 64 bit image available for testing. This version supports addressing all 4 GB of RAM if available. The WiFi fix for bootflags3 is also already implemented into the precompiled version. Get my custom built kernel from the Ubuntu-Server-raspi4-unofficial GitHub page.
32 bit (armhf)
To get the 32 bit version head to the official Ubuntu Raspberry Pi page at https://wiki.ubuntu.com/ARM/RaspberryPi and scroll to the “Official Images” section. Until the official Raspberry Pi 4 image is released choose the Raspberry Pi 3B+ armhf release and follow the directions in the next sections to update the firmware for a Pi 4 boot.
Writing the Base Image
This part is easy. Extract the image from xz format to img format (7zip is great and free and can extract these). Now write the img to your media (Micro SD card, solid state drive, USB storage, etc). the same way you would for any other distribution!
Performance
Storage
Beyond keeping your firmware and distribution up to date there is only one thing that sets apart one Ubuntu installation on a Pi from any other: your storage device. The difference between a low end to high end SD card can be a 2-3x performance, and the difference between a SD card and a solid state drive is a whole order of magnitude.
To help people know whether they have high performance storage I made the Raspberry Pi Storage Benchmark that will give you a performance score. Running the benchmark is really easy. Paste or type the following commands:
The storage benchmark will run several well known and respected benchmarks such as iozone and fio and calculate a score for your device.
Most importantly, to compare your score or if you want to just view other benchmark submissions check out the full results of all submissions in a searchable/sortable table at the Raspberry Pi Storage Benchmark Results Page.
Recommended Gear
I highly recommend upgrading to a solid state setup. The performance gains are gigantic. It’s now less than 30 bucks to take your Pi solid state. This is the best performance upgrade you can possibly get for a Pi.
With the new Raspberry Pi 4 it’s even more beneficial to use USB storage since a USB 3.0 bus was finally added in the Pi 4 letting it take full advantage of solid state drives. This is the setup I am currently using:
Raspberry Pi 4
The Raspberry Pi 4 is available in different memory configurations all the way up to 8 GB. It’s about the size of a credit card and uses an extremely low amount of power making it ideal for all sorts of projects and ideas!
Links: AliExpress.com*, Amazon.ae*, Amazon.ca*, Amazon.com*, Amazon.com.au*, Amazon.com.mx*, Amazon*.co.jp*, Amazon.co.uk*, Amazon.de*, Amazon.es*, Amazon.fr*, Amazon.in*, Amazon.it*, Amazon.nl*, Amazon.pl*, Amazon.sa*, Amazon.se*, Amazon.sg*
Raspberry Pi 400 Kit*
The Raspberry Pi 400 kit includes everything you need for a full Pi 400 desktop build. The Pi 400 is the fastest Raspberry Pi ever released and comes in the form factor of a keyboard!
Links: AliExpress.com*, Amazon.ae*, Amazon.ca*, Amazon.com*, Amazon.com.au*, Amazon.com.mx*, Amazon.co.jp*, Amazon.co.uk*, Amazon.de*, Amazon.es*, Amazon.fr*, Amazon.in*, Amazon.it*, Amazon.nl*, Amazon.pl*, Amazon.sa*, Amazon.se*, Amazon.sg*
Kingston A400 2.5″ SATA SSD
The Kingston A400 has been a great drive to use with the Pi for years. It’s reliable, widely available around the world, has low power requirements and performs very well. It’s also very affordable. This drive has been benchmarked over 1000 times at pibenchmarks.com and is the #1 most popular SSD among the Pi community!
Links: AliExpress.com*, Amazon.ae*, Amazon.ca*, Amazon.com*, Amazon.com.au*, Amaz*o*n.com.mx*, Amazon.co.jp*, Amazon.co.uk*, Amazon.de*, Amazon.es*, Amazon.fr*, Amazon.in*, Amazon.it*, Amazon.nl*, Amazon.pl*, Amazon.sa*, Amazon.se*, Amazon.sg*
StarTech 2.5″ SATA to USB 3.0/3.1 Adapter
Both the USB 3.0 and USB 3.1 variants of the StarTech 2.5″ SATA adapter work well with the Pi 4. I’ve used the 3.0 variant with my Pi 4 since launch and it has always worked well. I later bought the 3.1 variant and had the same positive experience. These two adapter variants are my go to adapters for all my Pi related projects that need a fast and easy 2.5″ SATA SSD!
Links: Amazon.ae*, Amazon.ca*, Amazon.com*, Amazon.com.au*, Amazon.com.mx*, Amazon.co.jp*, Amazon.co.uk*, Amazon.de*, Amazon.es*, Amazon.fr*, Amazon.in*, Amazon.it*, Amazon.nl*, Amazon.pl*, Amazon.sa*, Amazon.se*, Amazon.sg*
Or for a compact setup:
SanDisk Extreme Pro SSD
The SanDisk Extreme Pro USB SSD is a true solid state drive. This is different than a typical “flash drive” which uses extremely cheap memory and has very low random I/O performance/throughput compared to a real solid state drive. I’ve used both the USB 3.1 and USB 3.2 variants with the Pi successfully and they benchmark very well!
Links: AliExpress.com*, Amazon.ae*, Amazon.ca*, Amazon.com*, Amazon.com.au*, Amazon.com.mx*, Amazon.co.jp*, Amazon.co.uk*, Amazon.de*, Amazon.es*, Amazon.fr*, Amazon.in,* Amazon.it*, Amazon.nl*, Amazon.pl*, Amazon.sa*, Amazon.se*, Amazon.sg*
SD Card Setup:
SanDisk Extreme A1
The SanDisk Extreme A1-A2 SD card has the best scoring SD card on pibenchmarks.com for years and is second in popularity only to the SanDisk Ultra (often included in combo kits). The application class (A1) means random I/O speeds (very important when running an OS) have to meet a higher standard. There’s no benefit on the Pi for A2 right now so get whichever is cheaper/available.
Links: AliExpress.com*, Amazon.ae*, Amazon.ca*, Amazon.com*, Amazon.com.au*, Amazon.com.mx*, Amazon.co.jp*, Amazon.co.uk*, Amazon.de*, Amazon.es*, Amazon.fr*, Amazon.in*, Amazon.it*, Amazon.nl*, Amazon.pl*, Amazon.sa*, Amazon.se*, Amazon.sg*
These storage choices are ones that all scored highly on the end-user submitted Raspberry Pi Storage Benchmarks and will give you outstanding I/O performance on the Raspberry Pi. I also personally own all of them and recommend them knowing they are compatible and perform well on the Pi.
GPIO support
All examples below are based on the «blinking led» schema. See https://pimylifeup.com/raspberry-pi-gpio/
The Debian kernel is compiled with CONFIG_STRICT_DEVMEM=y. You need to add iomem=relaxed to the kernel command line (/boot/firmware/cmdline.txt) to allow mmap on /dev/mem.
using RPi.GPIO (python3-rpi.gpio)
RPi.GPIO doesn’t support the RPI 4 currently. See this bug https://sourceforge.net/p/raspberry-gpio-python/tickets/191/ (with a patch that makes it working).
Debian bug:
using GPIOZERO
Debian has gpiozero version 1.4.1, which doesn’t work with the RPI 4. After fixing RPi.GPIO, gpiozero 1.5.1 (current git) works.
Debian bug:
Configuration file tweaks
We talked about this in my guide on
how to fix the screen resolution in MATE,
where you end up having either black bars top and bottom, or a black border around your desktop, and a
weird resolution like 1824×984 instead of full HD 1920×1080. I will briefly repeat some of the stuff,
for clarity.
There are two ways you can do this:
- Using the guided tool called
raspi-config. However, it may not be present in MATE or work
correctly. - Manually change the boot configuration file that is used to setup the system.
I would recommend you go for the manual change, because it also allows you to better understand what
you’re doing. The boot configuration is stored in the following locations:
- 32-bit Raspberry Pis (up to Model 3) under
/boot/config.txt. - 64-bit Raspberry Pi (Model 4) under
/boot/firmware/usercfg.txt.
On Raspberry Pi, /boot/firmware/config.txt also exists, but this file tells you not to write changes
to it directly, and to use usercfg.txt. At the bottom of the config.txt file, there’s an include
statement, which will pull all your manual overrides from the usercfg.txt file. So this is where we
want to make the change.
Open the file in a text editor as root or sudo:
sudo nano /boot/firmware/usercfg.txt
Then add the following lines in there:
dtoverlay=vc4-fkms-v3d
max_framebuffers=2
gpu_mem=128
hdmi_enable_4kp60=1
What we’re doing here, we’re enabling the 3D video driver (so-called Fake KMS), and we set the
memory to 128 MB — please note that Pi 4 does GPU memory management differently from previous models,
and since there is a discrete processor for graphics, you don’t need as much as you would use on
earlier hardware.
Now, there are two other drivers you can try, provided you don’t get the hardware acceleration
working as you like. So instead of dtoverlay=vc4-fkms-v3d, you can use:
dtoverlay=vc4-kms-v3d
Or this one:
dtoverlay=vc4-kms-v3d-pi4
You can also change the memory allocation for the GPU, but
this is not a
trivial topic. So we won’t go into that at this point. Just be aware that you have some flexibility
in how much memory you want to allocate. The amount of RAM your Pi has will also play a role in getting
the number right. 128 MB ought to be fine.
Memory splitting and CMA allocation
One more trick you can do is memory splitting. Basically, you can tell how much memory is allocated
to the GPU and how much goes to the CPU. Normally, the memory is allocated dynamically, but you can do
your own split. What it actually means is that once this value is crossed (in MB), the GPU will either
request more memory from the CPU, or relinquish some back — this can lead to potential performance
bottlenecks during intense operations, hence the split allows you to pre-optimize for characteristic
use cases. You can see this configuration if you run the raspi-config tool, for instance. It allows you
to specify how much memory will be given to the CPU (ARM), and how much to the GPU (VideoCore).

The actual setting is then (either kms or fkms) something like:
dtoverlay=vc4-kms-v3d, cma-128
dtoverlay=vc4-fkms-v3d, cma-128
Conclusion
I’m very excited to see my favorite Linux distributions continue to evolve to the point where they are comparable in performance and stability to Raspbian. I’ve been testing extensively on Ubuntu Server 32 bit and 64 bit for my Raspberry Pi Minecraft Server project and not only is it on par with Raspbian but starting to do things so well it sometimes makes Raspbian feel a little dated.
If you have any questions or suggestions don’t hesitate to leave me a comment on the post or use my contact form to message me privately! I’m good about responding quickly and my articles are constantly revised to address questions or do something a better way that a reader pointed out.
Have fun!
Accelerated 3D graphics on Debian
To get accelerated 3D graphics on Debian, you will need the following (status on 02/2021):
- Run Debian testing, because Mesa is Debian stable is not recent enough
- Build a kernel from github.com/raspberrypi/linux as documented above
Example config.txt:
arm_64bit=1
enable_uart=1
upstream_kernel=1
#http://lists.infradead.org/pipermail/linux-rpi-kernel/2020-November/007906.html
disable_fw_kms_setup=1

kernel=vmlinuz
initramfs initrd.img
Example cmdline.txt:
console=tty0 console=ttyS1,115200 root=/dev/mmcblk1p2 rw fsck.repair=yes net.ifnames=0 rootwait
(Editor’s Note 2021-06: Is a running glxgears and present /sys/class/drm/card0 a sure sign of 3D acceleration working?)
What to do next with Ubuntu MATE on your Raspberry Pi 3 B+
Now that Ubuntu MATE 18.04 is installed on your Pi, and that you can use ssh to control it, it’s time to go to the next step!
Here it really depends on what you want to do with it. For example, if you want to experiment on robotics applications (what this website is about):
- Setup and configure an IDE to edit files and write code. Some popular IDE for Raspberry Pi: Nano, Vim (check out how to install Vim on Raspberry Pi), Emacs
- Install ROS (Robot Operating System) to create scalable and powerful robot applications
- Experiment with GPIOs using the RPi.GPIO Python library or the WiringPi Cpp library.
- Learn how to make your programs automatically start on boot
- …
Запись изображения на SD-карту
Есть несколько различных приложений, доступных для бесплатного использования, которые позволяют использовать флэш-образы ISO на SD-карты. В этом уроке мы будем использовать Raspberry Pi Imager.
Raspberry Pi Imager — это утилита с открытым исходным кодом для прошивки операционных систем, работающих на Raspberry Pi, на SD-карты. Он доступен для Windows, macOS и Ubuntu.
Обратите внимание, что запись изображения на SD-карту является деструктивным процессом и стирает все существующие данные. Если у вас есть данные на SD-карте, сначала сделайте резервную копию
-
Вставьте SD-карту в привод SD-карты и запустите приложение Raspberry Pi Imager:
-
Нажмите кнопку «ВЫБРАТЬ ОС», чтобы открыть меню для выбора операционной системы. Прокрутите вниз и нажмите «Ubuntu»:
-
Вам будет представлен список образов Ubuntu на выбор. Выберите изображение в соответствии с вашей версией Pi. В этом руководстве мы используем Raspberry Pi 4 с 4 ГБ оперативной памяти и выберем 64-разрядную версию Ubuntu 20.04:
-
Нажмите кнопку «ВЫБРАТЬ SD-КАРТУ» и в новом меню выберите вставленную SD-карту. Если к вашей системе подключено более одной SD-карты, перед прошивкой образа убедитесь, что вы выбрали правильный диск:
-
Нажмите кнопку «ЗАПИСАТЬ», и Raspberry Pi Imager загрузит выбранное изображение и начнет процесс прошивки:
Процесс может занять несколько минут, в зависимости от размера файла и скорости карты.
-
В случае успеха приложение покажет следующее сообщение:
Это все! У вас есть загрузочная Ubuntu на SD-карте.
GitHub Project Location
The image and source code to build the image are open source and freely available on GitHub:
Raspberry Pi 4
The Raspberry Pi 4 is available in different memory configurations all the way up to 8 GB. It’s about the size of a credit card and uses an extremely low amount of power making it ideal for all sorts of projects and ideas!
Links: AliExpress.com*, Amazon.ae*, Amazon.ca*, Amazon.com*, Amazon.com.au*, Amazon.com.mx*, Amazon*.co.jp*, Amazon.co.uk*, Amazon.de*, Amazon.es*, Amazon.fr*, Amazon.in*, Amazon.it*, Amazon.nl*, Amazon.pl*, Amazon.sa*, Amazon.se*, Amazon.sg*
Raspberry Pi 400 Kit*
The Raspberry Pi 400 kit includes everything you need for a full Pi 400 desktop build. The Pi 400 is the fastest Raspberry Pi ever released and comes in the form factor of a keyboard!
Links: AliExpress.com*, Amazon.ae*, Amazon.ca*, Amazon.com*, Amazon.com.au*, Amazon.com.mx*, Amazon.co.jp*, Amazon.co.uk*, Amazon.de*, Amazon.es*, Amazon.fr*, Amazon.in*, Amazon.it*, Amazon.nl*, Amazon.pl*, Amazon.sa*, Amazon.se*, Amazon.sg*
Build Instructions
If you don’t want to use the precompiled binaries you can also build it yourself with the provided build script!
The build script is meant to be ran in a *throwaway* Ubuntu 18.04.4 Virtual Machine (VM). Here are the reasons you shouldn’t ignore this:
- Absolutely no steps have been taken to make the process “secure” or “safe” for your main machine
- It assumes the home directory is safe to build in (it’s not on a main system)
- It installs hundreds of development packages that you only need to build the image (would bog down a main system)
- It chroots into at least 4 different images during the build and chroots leak (causing instability/security concerns)
- If things go wrong with the type of commands used in the script your system can get borked *real quick* (like instantly)
Now assuming you have your fresh throwaway VM ready download the build script:
Now is a good time to read through the build script to understand what it is doing. It will download several images and update them in a chroot and then extract the firmware. It then sets up all of the changes/fixes in the target image.
Once you feel you are ready to proceed run the build script with:
The script’s final output will be “ubuntu-18.04.4-preinstalled-server-arm64+raspi4.img” along with the xz compressed version and an updates.tar.xz file which is meant to bring a normal 18.04.4 installation up to date.
Preinstalled Image Download / Instructions
To download the precompiled image see the releases section located at https://github.com/TheRemote/Ubuntu-Server-raspi4-unofficial/releases
The file you are looking for on the releases page is ubuntu-18.04.4-preinstalled-server-arm64+raspi4.img.xz. Download this file and extract the .img file from inside. Use the free and awesome 7-zip if you are on Windows to extract the .img file.
Now burn the .img file using your favorite program. I use Win32DiskImager. Now insert your SD card / storage device into the Pi and start it up!
Username: ubuntu
Password: ubuntu
Upon logging in for the first time you will be required to change the default password to something else. Once you have done that log back in and you should be all set!
How to Install Ubuntu on Raspberry Pi
1. Burn a card with the latest version of Ubuntu Server. The easiest way to do this is to run on your PC and select the latest version of Ubuntu server from the Choose OS menu. If you want to run 64-bit apps, make sure you select the 64-bit version of Ubuntu Server. For testing, we went with Ubuntu 19.10 (64-bit).
Select the latest version of Ubuntu server from the menu. (Image credit: Tom’s Hardware)
2. Boot your Raspberry Pi with the card inside and a connection to Ethernet. Unfortunately, it’s difficult to get Wi-Fi working from the command line, but you’ll be able to establish a wireless connection after you’ve installed a desktop environment (step 7).
3. Enter the default username and password. They are both ubuntu. You may have to hit enter to see the login prompt.
4. Change your password when prompted.
5. Enter sudo-apt-get update at the command prompt in order to get a list of the latest Ubuntu packages. If you get an error message saying, “temporary failure resolving ports.ubuntu.com,” you may need to change your DNS server by typing sudo nano /etc/resolv.conf and changing the content of the file to just nameserver 8.8.8.8.
6. Enter sudo apt-get upgrade at the command prompt to make sure the OS is up to date.
7. Enter sudo apt-get install ubuntu-desktop at the prompt to install the desktop environment. This could take a while, but it’s necessary to get a windowed environment. Select gdm3 when asked to pick a display manager.
You can substitute xubuntu-desktop (by changing the command accordingly) if you prefer a different look and feel. Some of our screenshots were taken in Xubuntu desktop.
8. Reboot your Raspberry Pi by entering sudo reboot. You should now have the desktop.
Ubuntu Desktop should show after reboot. (Image credit: Tom’s Hardware)
9. Select and log into your Wi-Fi network by clicking on the Wi-Fi icon in the upper right corner of the screen.
Select Network to connect to Wi-Fi. (Image credit: Tom’s Hardware)
At this point, you have Ubuntu up and running and you can either use the apps that come with it or install some of your own choosing, including BOINC. Note that, in our tests with Ubuntu 64-bit on a Raspberry Pi 4 (4GB), booting Ubuntu took several minutes, and the UI itself was quite laggy. Your mileage may vary.
Flash the image into a micro SD card
micro SD card requirements
Make sure you get a class 10 micro SD card. You can see the class of the card when you buy it. The class is related to the writing speed. As your SD card will serve as the complete OS for your Raspberry Pi 3 B+, you want something that is fast enough.
Your micro SD card should also have at least 8GB of space. This is the bare minimum, I advise you take a bigger card (16 or 32GB).
Extract the Ubuntu MATE image
OK, you have a micro SD card. Now you need to flash the image into this card.
Warning: don’t flash the archive – .xz file, first you need to extract it! (might sound obvious but the first time I used a Raspberry Pi I made this mistake)
To extract a .xz file, use:
- 7-zip or a similar software on Windows. Right-click on the image > extract here.
- On Linux, use unxz: (if you don’t have unxz installed: )
Flash the image
To flash the image I recommend you use the open source Etcher software. This is a very handy multi-platform software for flashing SD cards.
Download Etcher and launch the software (no installation needed). Insert your micro SD card into your computer.
Then, all you need to do is select the image you just downloaded + extracted, and the SD card. Then, click on “Flash!” and wait a few minutes.
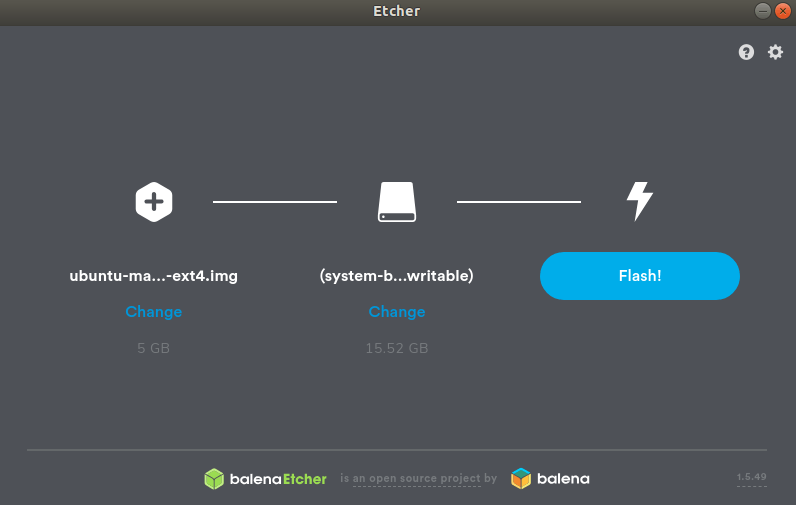
Even if the image size is much lower than the actual SD card size, don’t worry: when installing, the image will expand to take all the available space.
First configuration steps for Ubuntu 20.04 on the Raspberry Pi
Before the first start you can already prepare the Raspberry Pi with Ubuntu 20.04 This is recommended, especially if you want to connect the device to the network via Wi-Fi.
Wi-Fi or Ethernet cable
The first question will be whether you want to connect the Raspberry Pi to the network via Wi-Fi or Ethernet cable. With a cable, this is easy because you don’t have to do anything else.
If you want to configure the Raspberry Pi with Ubuntu 20.04 for wireless networking before the first boot, a small configuration step is necessary.
Let’s assume the microSD card is still in your computer, look for the partition system-boot. If necessary, you have to eject the disk and plug it in again. The partition contains configuration files that are loaded during the first boot. This is similar to configuring Raspbian for headless use.

Search on the partition system-boot for the file network-config
On the partition you will find a file network-config. Open it with a text editor and you will see that the developers provide examples.
network-config includes examples
You can remove the comments # and enter your values. For example:
Important: If your Wi-Fi network name contains a space, you must enclose the name in quotation marks: “My Wi-Fi Name”.
You can also change the network settings later by editing the file /etc/netplan/50-cloud-init.yaml.
In my case, the Wi-Fi didn’t work right away because the system didn’t put quotation marks in the password in the file 50-cloud-init.yaml. Now I had to do that myself and save the file. After another reboot Wi-Fi was working as it should.
Wi-Fi works now with Ubuntu 20.04 LTS Focal Fossa on the Raspberry Pi
That didn’t work as smooth as expected.
What’s next
We are working to do a lot more to improve the user experience of Ubuntu on Raspberry Pi. This tutorial was non-typical. Usually, tutorials live at ubuntu.com/tutorials, where you can find ‘how-tos’ on getting , or other projects, like building a Raspberry Pi cluster using MicroK8s.
This tutorial utilises Ubuntu Core, Ubuntu Core is not developer-friendly, we recommend its use for appliances, for fire-and-forget devices and for production. If you want to try other applications or build applications for the Raspberry Pi on Ubuntu we recommend you look into snaps and Ubuntu Server and take it from there.
Backup системы (с sd-карты)
Чтобы не снимать образ флешки можно бакапить систему файлами, используя rsync. Так образ занимает меньше места и при регулярном бакапе обновляет только изменившиеся файлы.
Создаем файл rsync-exclude.txt, со списком каталогов, которые мы не будем бакапить
На внешнем диске создаем каталог для бакапа, к примеру /mnt/hdd1/backups/pi/
И запускаем команду для бакапа (указываем где лежит файл исключений и куда копируем).
Когда понадобится восстановить используем обратную команду и восстанавливаем на второй раздел
Если редактировали раздел boot то можно бакапить и его, сначала восстановить его, а потом второй раздел.
loop-mounting images
# fdisk -l 2020-02-13-raspbian-buster-lite.img
Disk 2020-02-13-raspbian-buster-lite.img: 1,7 GiB, 1849688064 bytes, 3612672 sectors
Units: sectors of 1 * 512 = 512 bytes
Sector size (logical/physical): 512 bytes / 512 bytes
I/O size (minimum/optimal): 512 bytes / 512 bytes
Disklabel type: dos
Disk identifier: 0x738a4d67

Device                               Boot  Start     End Sectors  Size Id Type
2020-02-13-raspbian-buster-lite.img1        8192  532479  524288  256M  c W95 FAT32 (LBA)
2020-02-13-raspbian-buster-lite.img2      532480 3612671 3080192  1,5G 83 Linux

# mount -o loop,offset=$((8192*512)) 2020-02-13-raspbian-buster-lite.img mountpoint
How To Install Ubuntu To An SD Card
 Ubuntu On A Raspberry PI
You can read more about Ubuntu on the Raspberry PI by visiting https://ubuntu.com/raspberry-pi.
The downloads page shows all the available versions of Ubuntu for the Raspberry PI 2, 3, 4 and 400.
If you want to use your Raspberry PI as a desktop computer then the only version available for the Raspberry PI 4 is a 64-bit version.
The easiest way to install Ubuntu to an SD-Card is to use the Raspberry PI Imager.
 Install Ubuntu On Raspberry PI
When you insert the SD-Card for Ubuntu for the first time you will be asked to choose the language.
 Choose Keyboard Layout
The next step requires you to choose the keyboard layout.
 Choose WiFi Network
If you aren’t using an ethernet cable then you will be asked to choose your wireless network.
 Choose Location
The penultimate step is to choose your timezone by selecting your country on the map or entering it into the box provided.
 User Setup
The final step is to create a user by entering your name, a name for your computer, a username and a password.
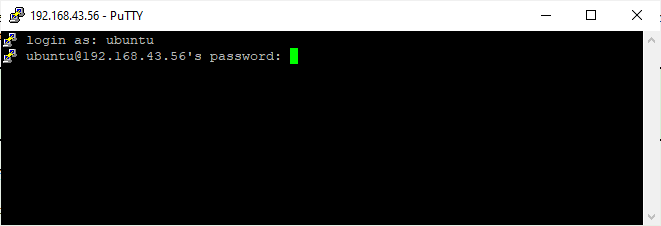
First ssh connection to the Raspberry Pi 4
Connect to the Pi wish ssh
If you’re on Windows (older than Windows 10 with October 2018 update), use a program such as Putty.
Put the IP address of the Pi and click on “Open”.
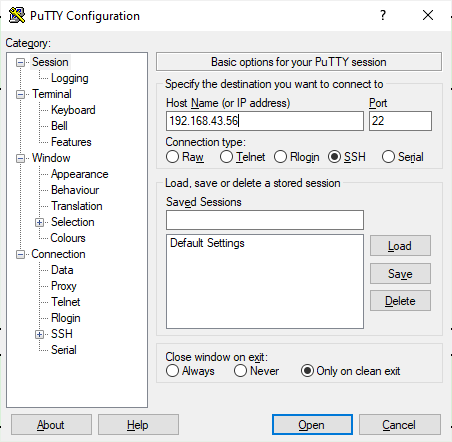
You’ll be asked to give username and password. Simply use “ubuntu” twice.
If you’re on Linux (or Windows 10 recently updated), simply connect to the Pi from a terminal, with the ssh command line tool: , and use “ubuntu” for the password.
Password change
The first time you connect to your Pi, you will be asked to change the default password (“ubuntu”).
Once done, the connection will be closed.
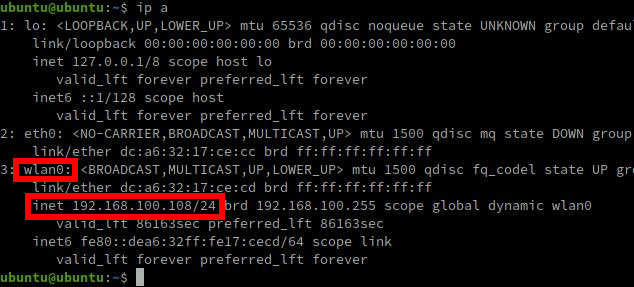
$ ssh ubuntu@192.168.43.57
The authenticity of host '192.168.43.57 (192.168.43.57)' can't be established.
ECDSA key fingerprint is SHA256:rNDFgb1H2GiIhNPJ7oYI5963+/vbob2HOY1W4FakG/0.
Are you sure you want to continue connecting (yes/no/)? yes
Warning: Permanently added '192.168.43.57' (ECDSA) to the list of known hosts.
ubuntu@192.168.43.57's password:
You are required to change your password immediately (administrator enforced)
Welcome to Ubuntu 20.04 LTS (GNU/Linux 5.4.0-1008-raspi aarch64)

 * Documentation:  https://help.ubuntu.com
 * Management:     https://landscape.canonical.com
 * Support:        https://ubuntu.com/advantage

  System information as of Wed Apr  1 17:26:14 UTC 2020

  System load:  0.1               Temperature:            57.9 C
  Usage of /:   6.1% of 28.95GB   Processes:              133
  Memory usage: 13%               Users logged in:        0
  Swap usage:   0%                IPv4 address for wlan0: 192.168.43.57

0 updates can be installed immediately.
0 of these updates are security updates.


The programs included with the Ubuntu system are free software;
the exact distribution terms for each program are described in the
individual files in /usr/share/doc/*/copyright.

Ubuntu comes with ABSOLUTELY NO WARRANTY, to the extent permitted by
applicable law.

WARNING: Your password has expired.
You must change your password now and login again!
Changing password for ubuntu.
Current password:
New password:
Retype new password:
passwd: password updated successfully
Connection to 192.168.43.57 closed.
Now, you can connect to your Pi again, using “ubuntu” as the username, and the new password you’ve just set.
Installing MicroK8s
Follow this section for each of your Pis. Once completed you will have MicroK8s installed and running everywhere.
SSH into your first Pi and there is one thing we need to do before we get cracking. We need to enable c-groups so the kubelet will work out of the box. To do this you need to modify the configuration file /boot/firmware/cmdline.txt:
And add the following options:
The full line for this particular raspberry pi looks like this:
Now save the file in your editor and reboot:
Once that’s done we can now Install the MicroK8s snap:

What Kubernetes version is this installing?
MicroK8s is a snap and as such it will be automatically updated to newer releases of the package, which is following closely upstream Kubernetes releases.
To follow a specific Kubernetes upstream series it’s possible to select a channel during installation. For example, to follow the v1.17 series:
Channels are made up of a track (or series) and an expected level of stability, based on MicroK8s releases (Stable, Candidate, Beta, Edge). For more information about which releases are available, run:
Discovering MicroK8s
Before going further here is a quick intro to the MicroK8s command line:
- The command will start all enabled Kubernetes services:
- The command will give you the status of services:
- The command will stop all Kubernetes services:
- You can easily enable Kubernetes add-ons, eg. to enable “kubedns”:
- To get the status of the cluster:
MicroK8s is easy to use and comes with plenty of Kubernetes add-ons you can enable or disable.