Install ubuntu mate 18.04 on raspberry pi 3 b+
Содержание:
- Which configuration for your Raspberry Pi 4 board?
- Первая загрузка
- Кратко о Ubuntu Mate
- Format the SD card (Windows 10)
- I2C example
- Kernel
- Установка Linux на «Малину»
- Отформатируйте SD-карту (macOS)
- Загрузите Raspberry Pi
- That’s all!
- How to Install Ubuntu on Raspberry Pi
- The Raspberry Pi PC
- Booting into Ubuntu Classic Server 16.04
- Что такое Ubuntu MATE? Зачем устанавливать его на Raspberry Pi?
- That’s it!
- Шаг 0. Первый контакт
- Overview
- Overview
- Install the Ubuntu Server image
- loop-mounting images
- Prepare the SD Card
- Запись изображения на SD-карту
- Setting locales for to solve Python 3 Package Manager (pip3) locale.Error: unsupported locale setting
- Checking if Python 3 is installed on the Ubuntu Classic Server 16.04
Which configuration for your Raspberry Pi 4 board?
When you buy a Raspberry Pi 4 board you can choose between different amounts of RAM: 1, 2, 4, or even 8 GB.
Once installed and configured, you can expect Ubuntu server to take something like 200MB minimum, without counting the RAM in cache (this is the data I got with the steps of this tutorial).
So, 1GB of RAM is possible, but you have to be careful when you start something, because your amount of available RAM is quite limited. I recommend you choose at least the Pi4 version with 2GB of RAM. The price difference between the 1GB and 2GB versions is not huge.
You are learning how to use Raspberry Pi to build your own projects?
Check out Raspberry Pi For Beginners and learn step by step.
Get this course for FREE for 14 days! Just click on the link above.
If you only have a 1GB RAM board available, it’s ok! Everything will still work. In fact, before Raspberry Pi 4, boards like Pi 2, Pi 3B, and Pi 3B+ only had one possible hardware configuration: 1GB RAM. So if it was possible then, it is possible now. 2+GB of RAM will simply allow you to launch more/bigger programs and care less about RAM usage.
Первая загрузка
Подключите недавно созданную карту Micro SD Ubuntu Core к Raspberry Pi. Кроме того, подключите кабель HDMI и клавиатуру. Когда Pi включится, вы увидите подсказку на экране. Это приглашение сообщает пользователю, что он готов к настройке. Нажмите клавишу ввода, чтобы начать процесс настройки Ubuntu Core.
Выберите «Пуск». На первой странице вам нужно настроить сетевое соединение для Pi. Ubuntu Core поддерживает подключения как по Ethernet, так и по беспроводной сети. Используете Pi 3 и вам нужен Wi-Fi? Выберите «wlan0» и перейдите оттуда.
Конфигурация
Примечание: пользователи Pi 2, если вам требуется Wi-Fi, вам понадобится беспроводной USB-ключ для подключения.
Во время настройки сети обязательно выберите «Использовать DHCPv4» при использовании IPv4. Эта опция автоматически назначит устройству IP-адрес. Использовать Ipv6? Вместо этого выберите «Использовать DHCPv6».
После настройки сетевого подключения Ubuntu Core попросит пользователя ввести адрес электронной почты. Имейте в виду, что это адрес электронной почты, который соответствует ранее созданной учетной записи Ubuntu. Введите его, затем выберите «Готово».
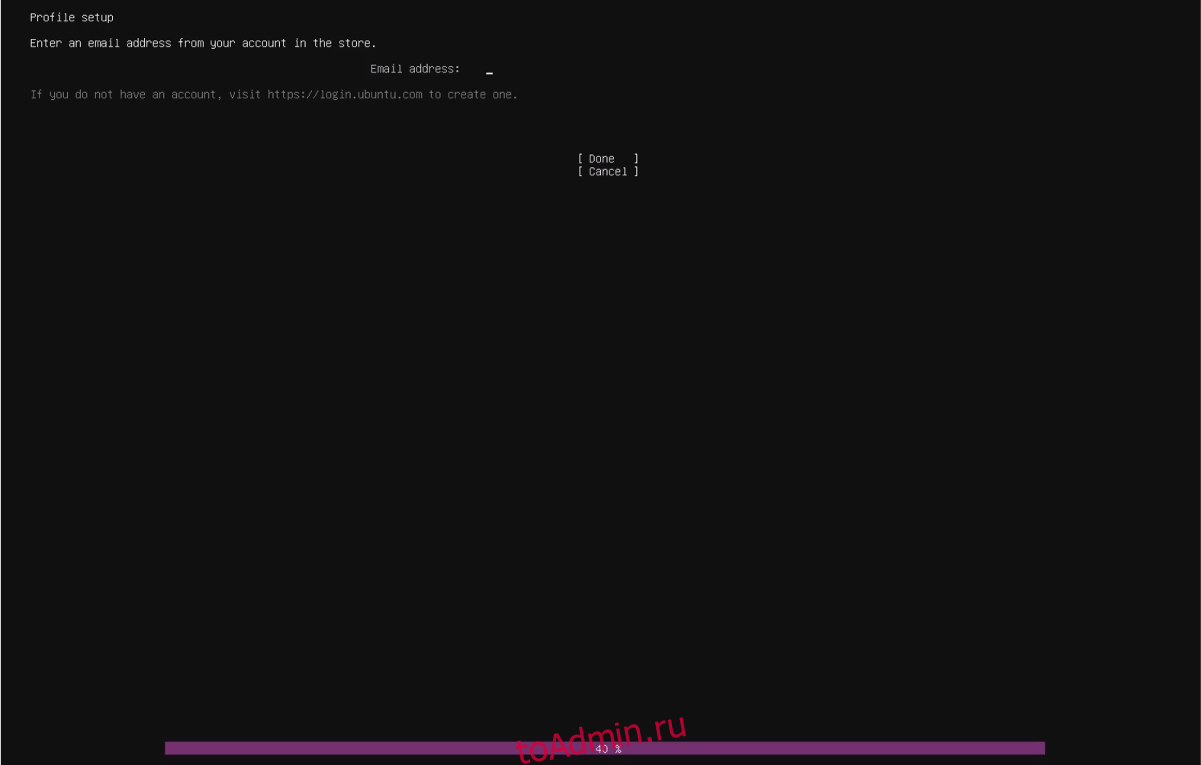
При попытке входа в систему Ubuntu Core сообщит пользователю, что устройство зарегистрировано для введенной учетной записи электронной почты и что можно войти в систему через SSH.
Скопируйте команду SSH, которую он печатает на экране, и используйте ее в терминале на вашем ПК с Linux. Имейте в виду, что для входа в систему требуется тот же ключ SSH, который применялся ранее. Убедитесь, что ключ, добавленный к вашей учетной записи Ubuntu, также присутствует на любом ПК, который используется для входа в систему. Файл должен находиться в ~ / .ssh / id_rsa.pub
Кратко о Ubuntu Mate
В OpenSource-сообществе принято так, что, если кому-то не нравится новая веха развития какого-то продукта, они делают форк его старой версии. В результате этот проект продолжает развиваться, но под другим названием.
Так, несколько лет назад произошло с Gnome. Многие привыкли к его второй версии. К тому же она была довольно производительной. Поэтому ее форкнули, и назвали данный продукт Mate.

Сейчас Gnome 2 под указанным названием доступен для всех систем на Linux. Даже делают специальные версии дистрибутивов, в которых «в коробки» поставляется данное окружение. В случае с Убунтой, таковым является Ubuntu Mate.
Загрузить данную систему можно с официального сайта проекта, расположенного по адресу: ubuntu-mate.org. Оказавшись на нем, потребуется:
- перейти в раздел Download;
- проскролить страницу до низу;
- выбрать пункт Raspberry Pi 3;
- на загрузившейся странице нажать на Download.
Format the SD card (Windows 10)
Insert your SD card into the slot on your computer or a USB adapter.
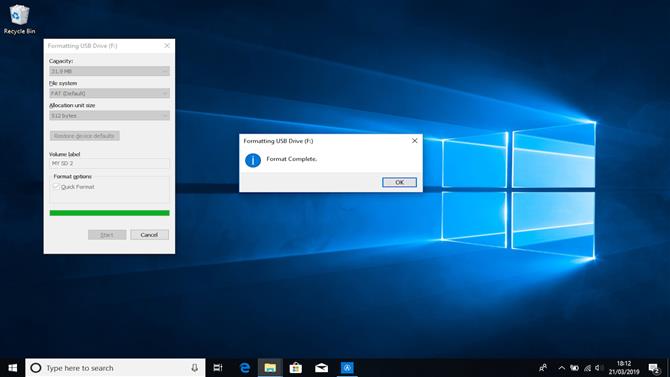
Windows will now inform you that you need to format the disk in order to continue. Click ‘Format Disk’. Next, you can choose the format, file system, allocation unit size and volume label. Windows will warn you that formatting will erase all previous data on the SD card. Choose ‘Ok’ to continue. The device will then be formatted.
If you don’t see the above notification, open Windows Explorer. Search for the SD drive. Right-click on this and from the drop-down menu, select format. Windows will automatically default to FAT32.
Etcher will quickly write Ubuntu MATE to your microSD card
I2C example
The I²C example I have created makes use of the Raspberry Pi as the leader and an Arduino Uno as the follower. It uses I²C to have the Arduino Uno blink its onboard LED. The I²C pins on the Raspberry Pi are GPIO 2 and 3. We wire the Pi and Arduino together as follows:

In order to have the Arduino act as an I²C follower, run the following sketch on it:
This sketch joins the I²C bus at address 8. To test that it is working properly, run on your Raspberry Pi. The output should look something like this:
If you see the in the first row as above, the Arduino is awaiting instructions over I²C. If you are new to Arduino boards and are unfamiliar with how to compile and upload the sketch, click here for more information.
To have the Raspberry Pi send instructions to the Arduino over I²C, run the following Python script:
If run successfully, the built-in LED on the Arduino Uno will blink on and off for one second each. As you can see, the LGPIO code is as simple as to open the I²C device and to send the data.
Kernel
The kernel used by the Raspberry Pi 2 port is an Ubuntu-style kernel package of an «rpi2» flavor, e.g. linux-image-3.18.0-20-rpi2. Currently it is comprised of the following functionality:
- Mainline 3.18.x
-
Fork of Ubuntu-3.18.0-14.15 from the ubuntu-vivid git tree
- Provides extra functionality such as aufs
- Also includes additional stability fixes, many of which have been rolled into mainline post-3.18.7
-
Raspberry Pi-specific patches from the rpi-3.18.y branch of Raspberry Pi’s linux git tree
Ubuntu’s 3.18 development is no longer active, as they moved on to 3.19 to be released with 15.04 vivid. However, mainline 3.18 was designated an LTS kernel release, and is still getting active security/stability updates. Because of this, 3.18 will likely remain the «supported» kernel of this port. (Again, this is an unofficial port and no support guarantee is implied.)
Установка Linux на «Малину»
Так как систем для RPi существует много, то рассмотрение процесса инсталлирования каждой из них отняло бы очень много времени. Да, и к тому же это бессмысленно, так как принцип установки всегда более или менее одинаков. Поэтому ниже будет описан процесс инсталлирования только одной ОС – Raspbian.
Установка Noobs
Поставить систему на «Малину» можно несколькими способами. Один из них – это использование специальной утилиты. Noobs для Raspberry Pi 3 можно скачать с официального сайта Респберри, из раздела Downloads.
Указанную программу нужно ставить на MicroSD, объем которой не меньше 8 гигабайт. Карту нужно установить в кардридер, а затем скинуть на неё файлы, которые лежат в скаченном архиве Noobs. Когда процесс копирования будет завершен, можно будет вытащить флэшку из кардридера и установить ее в RPi.
Установка Raspbian через Noobs
После включения «Малины» на подключенном к ней мониторе появится радужная картинка – если она отображается, то видеочип работает нормально. Мгновением позже на экране отобразится окно со списком систем. Из него следует выбрать Raspbian. Но, конечно, при желании можно остановиться и на другой.

Далее всплывет диалоговое окно, в котором следует просто нажать Yes. После этого начнется процесс копирования нужных файлов. В большинстве случаев он занимает 15-20 минут. Когда прогресс-бар заполнится, появится окошко с кнопкой OK. Клик по ней приведет к перезагрузке компьютера.
При следующем включении загрузится не Noobs, а уже непосредственно Raspbian. Система будет практически полностью готова к использованию. Но при желании ее можно дополнительно сконфигурировать. Для этого следует обратиться к официальной документации.
Что следует сделать после установки Raspbian
После того, как система инсталлирована, рекомендуется выполнить всего одну вещь – провести обновление пакетов, системы и BIOS. Для этого нужно зайти в консоль и вначале ввести там sudo -i и указать пароль (Raspberry). После этого до окончания сеанса не потребуется перед каждой командой вводить sudo.
Теперь непосредственно о том, как выполняются апдейты. Команда apt update – загружает и устанавливает самые свежие пакеты, apt upgrade – обновляет систему в целом, rpi-update – инсталлирует последнюю версию BIOS.
Как можно убедиться, в развертывании Linux на RPi3 нет абсолютно ничего сложного. Зная о том, как установить Noobs на Raspberry Pi 3, можно инсталлировать любой популярный дистрибутив, поддерживаемый «Малиной». Единственная трудность, с которой способен столкнуться новичок – это выбор ОС. Но если вы не знаете, на какой системе остановиться, тогда просто устанавливайте Raspbian.
Отформатируйте SD-карту (macOS)
Чтобы ваша карта microSD была совместима с Raspberry Pi, она должна быть отформатирована в FAT32.
Подключите карту microSD к вашему Mac. Система автоматически установит его. Нажмите «Прожектор» в правом верхнем углу экрана, введите «Дисковая утилита» и нажмите клавишу возврата.
После запуска Дисковой утилиты выберите карту microSD в списке доступных дисков на панели слева. Перейдите на вкладку «Стереть», затем выберите «MS-DOS (FAT)» из выпадающего меню «Формат».
Вы также можете указать название карты microSD, например, МОЯ SD 1. Нажмите кнопку «Стереть», когда будете готовы.
Вам нужно будет это сделать, если вы используете Windows 10 или macOS
Загрузите Raspberry Pi
Вы можете использовать свой Raspberry Pi как безголовый компьютер и подключаться к нему через SSH или подключаться к дисплею HDMI.
Вставьте SD-карту в свой Pi и включите его. Если вы используете монитор и клавиатуру, подключите их перед включением платы Raspberry Pi.
Имя пользователя по умолчанию — ubuntu , пароль — ubuntu .
Для загрузки Pi потребуется несколько минут. После подключения к сети вы можете найти IP-адрес Raspberry Pi в таблице аренды DHCP вашего маршрутизатора и войти в свой Ubuntu через ssh:
При первом входе в систему вам будет предложено изменить пароль пользователя ubuntu .
That’s all!
In Will’s original post the tutorial ended with a homework assignment where he challenges you to modify the PWM script to monitor the CPU temperature and set the speed of the fan accordingly. If you want to give it ago and see more information head over to his blog and read on.
Now you’re done and, hopefully, you’ve had a chance to play around with GPIO on Ubuntu on Raspberry Pi. If this tutorial helped you and you go on to make things using GPIO on Ubuntu on a Pi, whatever it may be, let us know. Either comment below on this tutorial or find your way over to the Raspberry Pi forum, we lurk over there too.
If you do end up building a project off the back of this tutorial and you would like to share it with the Ubuntu community as a blog post or even as a tutorial for this very site, reach out to a member of the Ubuntu Community team and we’ll get something going!
Was this tutorial useful?
Thank you for your feedback.
How to Install Ubuntu on Raspberry Pi
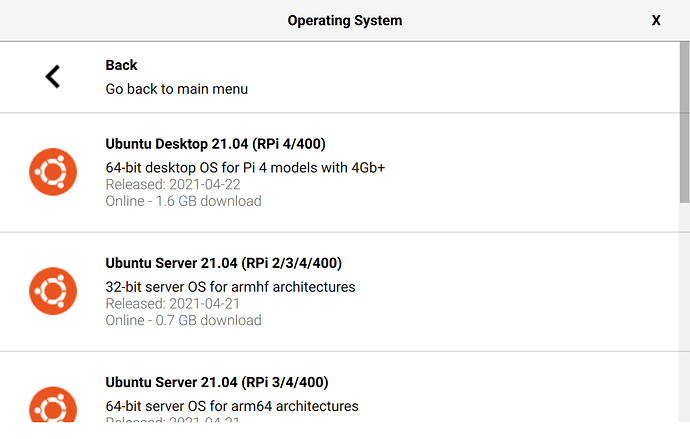
1. Burn a card with the latest version of Ubuntu Server. The easiest way to do this is to run on your PC and select the latest version of Ubuntu server from the Choose OS menu. If you want to run 64-bit apps, make sure you select the 64-bit version of Ubuntu Server. For testing, we went with Ubuntu 19.10 (64-bit).
Select the latest version of Ubuntu server from the menu. (Image credit: Tom’s Hardware)
2. Boot your Raspberry Pi with the card inside and a connection to Ethernet. Unfortunately, it’s difficult to get Wi-Fi working from the command line, but you’ll be able to establish a wireless connection after you’ve installed a desktop environment (step 7).
3. Enter the default username and password. They are both ubuntu. You may have to hit enter to see the login prompt.
4. Change your password when prompted.
5. Enter sudo-apt-get update at the command prompt in order to get a list of the latest Ubuntu packages. If you get an error message saying, “temporary failure resolving ports.ubuntu.com,” you may need to change your DNS server by typing sudo nano /etc/resolv.conf and changing the content of the file to just nameserver 8.8.8.8.
6. Enter sudo apt-get upgrade at the command prompt to make sure the OS is up to date.
7. Enter sudo apt-get install ubuntu-desktop at the prompt to install the desktop environment. This could take a while, but it’s necessary to get a windowed environment. Select gdm3 when asked to pick a display manager.
You can substitute xubuntu-desktop (by changing the command accordingly) if you prefer a different look and feel. Some of our screenshots were taken in Xubuntu desktop.
8. Reboot your Raspberry Pi by entering sudo reboot. You should now have the desktop.
Ubuntu Desktop should show after reboot. (Image credit: Tom’s Hardware)
9. Select and log into your Wi-Fi network by clicking on the Wi-Fi icon in the upper right corner of the screen.
Select Network to connect to Wi-Fi. (Image credit: Tom’s Hardware)
At this point, you have Ubuntu up and running and you can either use the apps that come with it or install some of your own choosing, including BOINC. Note that, in our tests with Ubuntu 64-bit on a Raspberry Pi 4 (4GB), booting Ubuntu took several minutes, and the UI itself was quite laggy. Your mileage may vary.
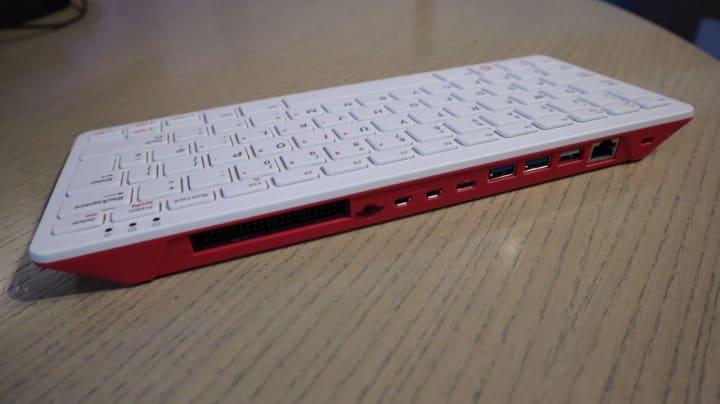
The Raspberry Pi PC
Raspberry Pi users have been wanting to use these single-board computers as their main PC for as long as the board has existed. But a full desktop takes a lot of juice and for everyday users, without the technical knowledge, it wasn’t really possible.
Of course, people have made do, the Raspberry Pi has seen incredible success. Raspberry Pis are used for education in schools and universities, they are the most popular single-board computer for tinkering, and have become enterprise products and home hobby projects alike.

Now we see that the Raspberry Pi Foundation didn’t forget. With the Raspberry Pi 4s graphics, RAM and connectivity specs, it’s powerful enough to work comfortably as a Linux workstation. And with the Ubuntu Desktop support, users have a way to turn their Raspberry Pi into their main PC. It’s almost indistinguishable from a Dell, HP or Lenovo lower end workstation. Almost.
The biggest difference is the hardware experience. Take one look at the ‘What you’ll need’ section of any Raspberry Pi tutorial and you’ll see a long list. Then, once you have everything, you set it up, it looks, unorganised. Don’t mistake me, it looks great, there’s something satisfying about assembling it all and seeing the fruits strewn over the desk. But even with wireless components, it can look unorganised.
Booting into Ubuntu Classic Server 16.04
With the assembly of Raspberry Pi 3 board and Official Raspberry Pi case, I then connected one end of the RJ45 cable to the RJ45 port on my Raspberry Pi 3 board and the other end of the cable to one of the switch port on my home router.
To facilitate the configuration of Ubuntu Classic Server 16.04, I connected my trusty mouse, keyboard, monitor to the USB and HDMI ports of my Raspberry Pi 3 board.
The default username to login Ubuntu Classic Server 16.04 is ubuntu and the password is ubuntu.
At the first login, the system will prompt for password change. I entered ubuntu as the current password and my favourite password twice to change the default password:
You are required to change your password immediately (root enforced)
(current) UNIX password:
Enter new UNIX password:
Retype new UNIX password:
passwd: password updated successfully
After I had changed the password, I supplied ubuntu as the username and my favourite password to the login prompt to continue with configuring my Ubuntu Classic Server 16.04 on my Raspberry Pi 3.
Что такое Ubuntu MATE? Зачем устанавливать его на Raspberry Pi?

Многие из вас могут знать, что Ubuntu, самый популярный дистрибутив Linux, имеет много официальных версий, в том числе Ubuntu MATE, Ubuntu Budgie, Kubuntu, Xubuntu и т. Д. Эти версии Ubuntu поставляются с различными средами и пакетами рабочего стола.
Как следует из названия, Ubuntu MATE поставляется с настольной средой MATE. MATE является продолжением надежного GNOME 2. Благодаря своей привлекательной внешности и интуитивно понятному дизайну эта активно развивающаяся среда рабочего стола набирает большие очки в списках лучших сред рабочего стола для Linux.
Пользователи не должны путать Ubuntu MATE для Raspberry Pi 2 и Raspberry Pi 3 с операционной системой Ubuntu Snappy Core. Ubuntu MATE значительно легче, чем флагманский выпуск Ubuntu. Разработанная Мартином Вимпрессом и Рохитом Мадхаваном версия Raspberry для Ubuntu MATE основана на выпуске Ubuntu 16.04.2 LTS. Само собой разумеется, что это довольно легкий.
Прежде чем продолжить и показать, как установить Ubuntu MATE на Raspberry Pi 3, позвольте мне сказать, что в этот дистрибутив загружен выбранный набор приложений по умолчанию. В нем есть все программное обеспечение, необходимое для выполнения ваших повседневных обязанностей, включая файловый менеджер Caja, текстовый редактор Pluma, LibreOffice, Scratch, IDLE, Sonic Pi, VLC, Rhythmbox, Shotwell и т. Д.
That’s it!
You are now in control of your Kubernetes cluster: once Pis are setup with MicroK8s, adding and removing nodes is easy and you can scale up or down as you go.

What’s next?
The opportunities from here onwards are endless, we can’t wait to see what you come up with with your Pi cluster. For feedback, bug reports or contributing, reach out on GitHub, chat with us on the Kubernetes Slack, in the #microk8s channel, Kubernetes forums or tag us @canonical or @ubuntu, on Twitter (#MicroK8s).
And we of course recommend reviewing the microk8s documentation to get better acquainted with MicroK8s.
Was this tutorial useful?
Thank you for your feedback.
Шаг 0. Первый контакт
Здесь и далее я буду подключать Raspberry через WiFi. Начнем с того, что пропишем в нашем домашнем DHСP сервере статический IP-адрес Raspberry. Это нужно для удобства, чтобы не выяснять каждый раз, как достучаться до малинки.
Качаем образ Ubuntu от сюда. На данный момент это Ubuntu Server 20.04.2 LTS 64-bit. Заливаем на SD карту при помощи Balena Etcher. Вынимаем карту и … снова вставляем откуда взяли. Это нужно, чтобы загрузочный сектор Ububuntu стал доступен в проводнике. Открываем файл и прописываем туда параметры WiFi. Должно получится что-то вроде:
А теперь немного комментариев разработчиков:
Для этого нам и нужен монитор с клавой. И да, дефолтный логинпароль такой же. Если выдается сообщение значит нужно просто немного подождать и попробовать еще раз. Затем нам предложат задать свой супер-мега-сложный пароль и не отстанут, пока не сделаем это. Как только мы получили доступ к телу командной строке — перезагружаемся. Верный признак, что коннект есть — Ubuntu рапортует, что можно поставить несколько апдейтов. Узнать IP и MAC адрес малинки можно командой . А теперь идем в настройки роутера и прописываем статический IP дли MAC одноплатника. Как это сделать не скажу — здесь все индивидуально.
Overview
As of Linux kernel 5.11, the old methods of communicating with header pins on the Raspberry Pi no longer work. This means packages such as RPi.GPIO no longer function properly with newer kernels. This post by Dave Jones (waveform) explains the reasons for the changes. But fear not, there is a new package in Ubuntu 21.04 called LGPIO that allows full control over the header pins with the latest kernel version. This tutorial covers some basic functionality of LGPIO, including examples using basic GPIO control, I²C, PWM, and SPI.
If you already have Ubuntu 21.04 or newer set up on a Raspberry Pi, you are ready for this tutorial. Otherwise, please see how to install Ubuntu Server on your Raspberry Pi and make it 21.04.
What you’ll learn
- How to install and get started with GPIO pins on Ubuntu
- Basic GPIO operations
- Basic I2C operations
- Basic PWM operations
What you’ll need
A Raspberry 3 or 4 with Ubuntu 21.04 setup and installed
Optionally for the examples:
- A simple breadboard
- 7x 330ohm resistors
- A single red, green or blue LED
- 10 male jumper wires
- 20 female to male jumper wires
- An Arduino Uno
- 5V PWM fan
- A RGB LED
- A rotary encoder
- An MCP3008 analog to digital converter
Overview
This tutorial will be a brief walk through the process of getting MicroK8s up and running on Raspberry Pi, and joining multiple Pis to form a production-grade Kubernetes cluster.
MicroK8s is a lightweight, fast, enterprise-grade Kubernetes. Whether you’re new to K8s or a power user, MicroK8s will help you save time and space on any embedded device or IoT projects.
This setup can be fully headless or using an HDMI screen and USB keyboard to control nodes of your cluster.

What you’ll learn
- Deploying Kubernetes on Raspberry Pi using MicroK8s
- Joining multiple deployments to form a cluster
- Managing the cluster: adding and removing nodes
What you’ll need
- A 16.04 LTS (or later) Ubuntu desktop
- A minimum of 2 Raspberry Pis, they need to be Pi 3B or later. (You can use as many as you like, here we use 3)
- A micro-USB power cable for each Pi (USB-C for Pi4)
- A USB power-supply with as many ports as you have boards
- A microSD card per Pi (8GB recommended), flashed with an Ubuntu Server image
- Some basic command-line knowledge
Optional:
- A monitor with an HDMI interface
- An HDMI cable if you’re using Pis 2 or 3 or a MicroHDMI cable for the Pi 4
- A Cat5/6 network cable for each board is preferred, but Wi-FI setup is possible as well
- A USB keyboard
- A cluster rack (Here we are using the Cluster Case from the PiHut)
You will also need to have all of the boards on the same network, with a terminal window ready to connect to each Pi through SSH.
Install the Ubuntu Server image
Grab your official Ubuntu Server for Raspberry Pi 2 image (the latest version at time of writing is but in a few days the image for Ubuntu 16.04.4 should be available, it will save you some time when upgrading it (and save some write cycles on your Micro SD card). Once downloaded, you need to insert the Micro SD card on your computer (you probably need a USB card reader for that) and try to figure out which device it corresponds to, see the Ubuntu documentation for further guidance. I assume you know what you do but be weary that the next command if done on the wrong device could wipe out the data on that device. I do not take any responsibility if things go wrong.
$ xzcat ubuntu-16.04.4-preinstalled-server-armhf+raspi2.img.xz | dd of=<device> bs=4M oflag=dsync status=progress
loop-mounting images
# fdisk -l 2020-02-13-raspbian-buster-lite.img
Disk 2020-02-13-raspbian-buster-lite.img: 1,7 GiB, 1849688064 bytes, 3612672 sectors
Units: sectors of 1 * 512 = 512 bytes
Sector size (logical/physical): 512 bytes / 512 bytes
I/O size (minimum/optimal): 512 bytes / 512 bytes
Disklabel type: dos
Disk identifier: 0x738a4d67

Device                               Boot  Start     End Sectors  Size Id Type
2020-02-13-raspbian-buster-lite.img1        8192  532479  524288  256M  c W95 FAT32 (LBA)
2020-02-13-raspbian-buster-lite.img2      532480 3612671 3080192  1,5G 83 Linux

# mount -o loop,offset=$((8192*512)) 2020-02-13-raspbian-buster-lite.img mountpoint
Prepare the SD Card
- Insert the microSD card into your computer
- Install the Raspberry Pi Imager tool for your operating system. You can do this with the following links:
- Raspberry Pi Imager for Ubuntu
- Raspberry Pi Imager for Windows
- Raspberry Pi Imager for macOS
Or, if you are on Ubuntu, you can run:
- Once this is done, start the Imager and open the “CHOOSE OS” menu.

- Scroll down the menu click “Other general-purpose OS”.

- Here you can select Ubuntu and see a list of download options. For this tutorial we recommend you select the Ubuntu Core 18 32-bit armhf download. As indicated in the imager this will work for the Raspberry Pi 2,3, 3+ and any of the 4’s.
- Select the image and open the “SD Card” menu. Select the microSD card you have inserted.
- Finally, click “WRITE” and wait for the magic to happen… (This magic might take a few minutes)
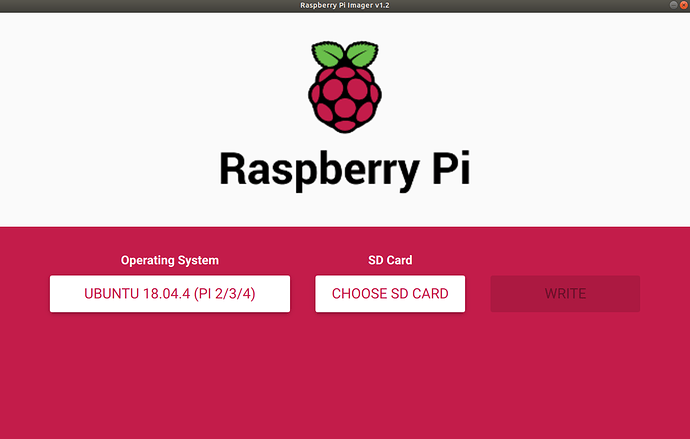
Запись изображения на SD-карту
Есть несколько различных приложений, доступных для бесплатного использования, которые позволяют использовать флэш-образы ISO на SD-карты. В этом уроке мы будем использовать Raspberry Pi Imager.
Raspberry Pi Imager — это утилита с открытым исходным кодом для прошивки операционных систем, работающих на Raspberry Pi, на SD-карты. Он доступен для Windows, macOS и Ubuntu.
Обратите внимание, что запись изображения на SD-карту является деструктивным процессом и стирает все существующие данные. Если у вас есть данные на SD-карте, сначала сделайте резервную копию
-
Вставьте SD-карту в привод SD-карты и запустите приложение Raspberry Pi Imager:
-
Нажмите кнопку «ВЫБРАТЬ ОС», чтобы открыть меню для выбора операционной системы. Прокрутите вниз и нажмите «Ubuntu»:
-
Вам будет представлен список образов Ubuntu на выбор. Выберите изображение в соответствии с вашей версией Pi. В этом руководстве мы используем Raspberry Pi 4 с 4 ГБ оперативной памяти и выберем 64-разрядную версию Ubuntu 20.04:
-
Нажмите кнопку «ВЫБРАТЬ SD-КАРТУ» и в новом меню выберите вставленную SD-карту. Если к вашей системе подключено более одной SD-карты, перед прошивкой образа убедитесь, что вы выбрали правильный диск:
-
Нажмите кнопку «ЗАПИСАТЬ», и Raspberry Pi Imager загрузит выбранное изображение и начнет процесс прошивки:
Процесс может занять несколько минут, в зависимости от размера файла и скорости карты.
-
В случае успеха приложение покажет следующее сообщение:
Это все! У вас есть загрузочная Ubuntu на SD-карте.
Setting locales for to solve Python 3 Package Manager (pip3) locale.Error: unsupported locale setting
After was installed successfully, I proceeded to test it with the following command:
pip3 list
However, I was greeted with the following error:
Traceback (most recent call last):
  File "/usr/bin/pip3", line 11, in <module>
    sys.exit(main())
  File "/usr/lib/python3/dist-packages/pip/__init__.py", line 215, in main
    locale.setlocale(locale.LC_ALL, '')
  File "/usr/lib/python3.5/locale.py", line 595, in setlocale
    return _setlocale(category, locale)
locale.Error: unsupported locale setting
To solve the error, I proceed to reconfigure the locales to one that is suitable for pip3. To do so, I typed in the following commands:
export LC_ALL="en_US.UTF-8"
export LC_CTYPE="en_US.UTF-8"
sudo dpkg-reconfigure locales
sudo localedef -i en_US -c -f UTF-8 en_US.UTF-8
I also opened up with nano:
sudo nano /etc/default/locale
And updated the contents to look like the following:
LANG="en_US.UTF-8"
LC_ALL="en_US.UTF-8"
LANGUAGE="en_US.UTF-8"
After the locales were reconfigured, I could run pip3 list which showed the list of Python 3 packages that are available:
blinker (1.3)
chardet (2.3.0)
cloud-init (0.7.7)
command-not-found (0.3)
configobj (5.0.6)
cryptography (1.2.3)
idna (2.0)
Jinja2 (2.8)
jsonpatch (1.10)
jsonpointer (1.9)
language-selector (0.1)
MarkupSafe (0.23)
oauthlib (1.0.3)
pip (8.1.1)
prettytable (0.7.2)
pyasn1 (0.1.9)
pycurl (7.43.0)
pygobject (3.20.0)
PyJWT (1.3.0)
pyserial (3.0.1)
python-apt (1.1.0b1)
python-debian (0.1.27)
python-systemd (231)
PyYAML (3.11)
requests (2.9.1)
setuptools (20.7.0)
six (1.10.0)
ssh-import-id (5.5)
ufw (0.35)
unattended-upgrades (0.1)
urllib3 (1.13.1)
wheel (0.29.0)
Checking if Python 3 is installed on the Ubuntu Classic Server 16.04
Since most of my MVPs are based on Python 3, I also checked whether Python 3 was preinstalled. To do so, I typed in the following command:
python --version
Which gave me the following output:
The program 'python' can be found in the following packages:
 * python-minimal
 * python3
Try: sudo apt install <selected package>
I then typed the following command to check for the python3 binary:
python3 --version
Which replied me with Python 3.5.1+.
This meant that I already had the Python 3 executable in the system and I can use the binary to run my Python 3 applications. If I need to run applications written in Python 2, I would install by issuing the following command:
sudo apt install python-minimal