Установка android на raspberry pi
Содержание:
- What You Need to Use a Tablet Display With Raspberry Pi
- Шлюз WebThings для Raspberry Pi
- The Process
- Создайте полностью умный телевизор с PiTV
- DOSBox
- Conclusion
- Install Android TV in Raspberry Pi
- Enjoy Your Media With Android TV on Raspberry Pi!
- Что умеет Raspberry Pi
- The Best Raspberry Pi Настольные операционные системы
- How to Solve Google Play Services issue on Raspberry Pie?
- Arduino IDE
- Менеджер пакетов Synaptic
- Don’t forget about Google Play!
What You Need to Use a Tablet Display With Raspberry Pi
Looking to set your Android device up as a display for your Raspberry Pi? It’s simpler than you’d think.
All you need is:
- A Raspberry Pi 3 or later (older versions will need a wireless networking dongle)
- Both devices connected to the same network
- A keyboard and mouse connected to the Raspberry Pi (USB, Bluetooth, or wireless)
- A tablet stand or suitable case for your Android device to use it as a monitor
This works.
Sadly, directly connecting your tablet display to a Raspberry Pi is not possible. Neither the GPIO nor the DSI port are compatible with tablet displays. This means using an old tablet screen for a Raspberry Pi display is impossible. Even if you manage to connect the devices, there won’t be any pleasing images.
And you might need a new Raspberry Pi.
Шлюз WebThings для Raspberry Pi
Шлюз WebThings от Mozilla — это программное обеспечение для шлюзов, используемых в системах умного дома, которое позволит напрямую мониторить и контролировать умные устройства через интернет без посредников.
Что вам понадобится
- Компьютер Raspberry Pi и источник питания (для Raspberry Pi 3 требуется не менее 2A)
- microSD card (не менее 8 ГБ, class 10)
- USB адаптер (см. список )
Примечание: Raspberry Pi 3 поставляется с Wi-Fi и Bluetooth. Адаптер USB необходим для подключения устройств по протоколам вроде Zigbee и Z-Wave.
2. Прошейте образ
Прошейте образ на карту microSD. Существуют разные способы записи. Мы рекомендуем использовать Etcher.
- Откройте Etcher
- Вставьте карту памяти в адаптер вашего компьютера.
- Выберите образ в качестве источника
- Выберите карту памяти
- Нажмите “Flash!”
После завершения, извлеките карту памяти.
3. Загрузка Raspberry Pi
- Вставьте карту памяти в Raspberry PI
- Подключите USB адаптеры при наличии
- Подключите питание для начала загрузки
Примечание: Первая загрузка Raspberry Pi может занять 2-3 минуты.
4. Подключение по Wi-Fi
После загрузки шлюз создаст точку доступа “WebThings Gateway XXXX” (где ХХХХ — это четыре цифры из MAC-адреса Raspberry Pi). Подключитесь к этой точке с вашего компьютера или смартфона.
После подключения вы должны увидеть приветственный экран шлюза WebThings, который затем начнёт поиск вашей домашней Wi-Fi сети.
Выберите вашу домашнюю сеть из списка и введите пароль для подключения.
Примечание:
- Если вы подключились к точке доступа “WebThings Gateway XXXX”, но не видите экрана приветствия, попробуйте открыть страницу по адресу 192.168.2.1.
- Raspberry Pi можно подключить к сети и с помощью кабеля Ethernet. В таком случае он попытается получить IP-адрес сети с вашего роутера автоматически. Затем наберите в браузере “http://gateway.local” для первичной настройки шлюза.
- Если вы переместите шлюз в другое место или он потеряет доступ к изначальной сети, то он автоматически перейдёт в режим точки доступа, чтобы вы смогли подключиться к нему и настроить другую сеть.
5. Выбор субдомена
После подключения шлюза к сети, убедитесь, что ваш компьютер или смартфон, с которого вы производите настройку, находится в той же сети. После этого перейдите по адресуgateway.local в браузере.
После этого у вас появится опция зарегистрировать бесплатный субдомен для доступа к шлюзу вне локальной сети через защищённый туннель от Mozilla.
Введите желаемый субдомен и адрес электронной почты (для сброса пароля в будущем), и нажмите «Create».
Примечание:
- Этот шаг можно пропустить и использовать шлюз полностью локально, либо настроив проброс портов и DNS самостоятельно. Однако в этом случае, если в будущем вы всё-таки решите использовать субдомен Mozilla, настройки шлюза придётся полностью сбросить.
- Если страница по адресу gateway.local не открывается, попробуйте узнать IP-адрес шлюза через ваш роутер (ищите в списке подключённых устройство вроде “gateway” или с MAC-адресом, начинающимся на “b8:27:eb”), и попробуйте открыть страницу прямо по IP.
- Если gateway.local и http:// не работают, убедитесь, что и ваш компьютер, и Raspbeery Pi подключены к одной и той же сети.
- Если вы уже регистрировали субдомен ранее, введите его имя и тот адрес электронной почты, который вы использовали при его регистрации. На экране появятся инструкции по получению доступа.
6. Создание аккаунта
После регистрации субдомена откроется страница со следующими этапами настройки шлюза. Введите ваше имя, адрес электронной почты и пароль, и нажмите «Next».
Примечание: Дополнительные аккаунты можно создать позже.
Готово!
После этого должна открыться страничка «Things» для подключения умных устройств к шлюзу.
См. Руководство пользователя шлюза WebThings для дальнейшей настройки.
The Process
By having the LineageOS installed on your Raspberry Pi, you can avail the benefit of Android OS and have better support for media software (like Kodi or YouTube) which makes your Raspberry Pi a great Android TV.
Step 1

Unpack the zipped file and let’s set things in motion. Remember the micro SD card? Well, connect it to your PC (insert it in the PC card reader slot) and run Etcher. Click on the Select Image which will let you browse the unzipped image file of LineageOS/Android OS. You can write the Android disk image on your micro SD card by clicking Flash. Just make sure that you have your SD card selected under the Select Drive.
Step 2
Once the process is completed by Etcher, you will be informed and you can then take out the micro SD card and place it in the Raspberry Pi and boot it up. Though it may take a little time on the first go, just be patient and wait. Once completed, set up the Wi-Fi connection by using a mouse and a Keyboard. An alternative is to directly connect the Raspberry Pi to the router via Ethernet cable.
Step 4
You now have Android OS running on your Raspberry Pi, but without any Google apps as this is an AOSP version. You need to manually install the apps for which you have the GApps package downloaded to your PC. Copy it to your USB and insert it in your Raspberry Pi.
Step 5
Open the App Drawer on your LineageOS and proceed as such; Device Preferences → About. Scroll down to find Build Number and keep clicking repeatedly which will add Developer Options Menu to the screen before.
Step 6
Exit the About Screen and proceed to Developer Options. Proceed as following from there; Enable Root Access. When a warning tab is displayed, click ok.
Step 7
Enable the terminal app by scrolling down to Local Terminal which will allow you access to Local Shell. Now you can enter commands via the keyboard.
Step 8
Go back to the App Drawer and relocate the Terminal App. To allow the apps permission to access your device, open and click Allow.
Step 9
Enter the commands as such:
su
This is the (superuser) command, a warning box for Privacy guard will appear. Proceed as following; Remember my choice → Allow.
Next, enter the command
rpi4-recovery.sh
This will load the recovery script. Next, type in
reboot
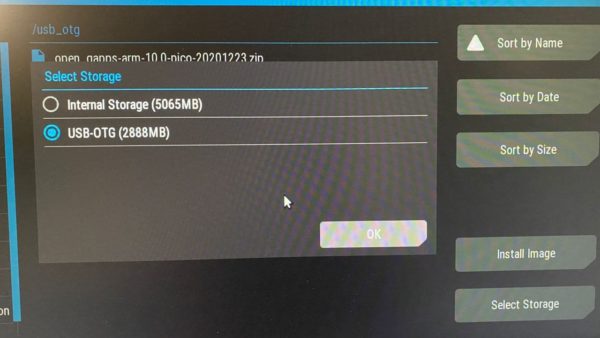
This command will launch the recovery script. Now your Raspberry Pi will boot into TWP recovery console. Click Install and select your USB as the storage device for this (bottom left corner).
Step 10
Proceed as following; select GApps→ Install Zip→ Reboot after installation→ Swipe to confirm flash. Now press Wipe Dalvik and then swipe it to confirm.
After clicking the top left icon (it will return you to the main menu.), click Wipe and “Swipe to Factory Reset”. After that, click Reboot → System.
Upon reboot, you will be able to access the Play Store but the LineageOS interface will not appear as Android TV. To change it to appear as Android TV, you will need a Launcher.
Step 11
You can find several launchers in the Play Store. Simply search, sign-in, and install. Install all the apps you would like from the Play Store afterwards.
Step 12
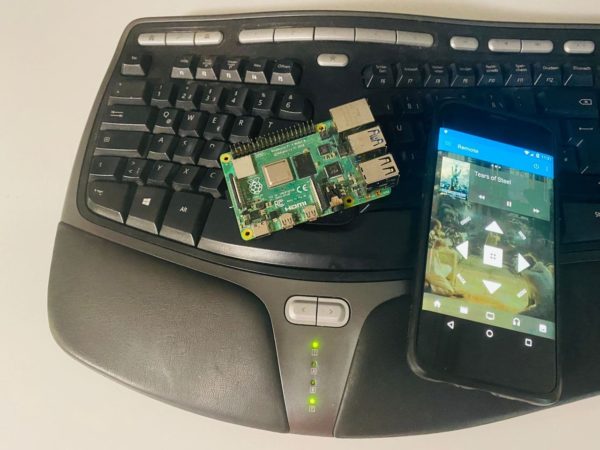
If you want to switch for something more convenient to control your Raspberry Pi Android TV, there are many options available online. Look online for mini keyboards with touchpads for android TV box and Raspberry Pi and plenty will pop up.
Now that you have your Raspberry Pi Android TV all set up, you can use the controller to browse/control it as you would for an actual Android TV. You can enjoy a variety of apps as well as install emulators to play games. The whole system will perform identical to an Android TV.
Создайте полностью умный телевизор с PiTV
До сих пор мы обходили динамику Smart TV. Если вы ищете что-то, что обеспечивает типичное для Smart TV представление с интерфейсным дисплеем, погодой, датой и временем, тогда PiTV — это ваше решение.
Требуя некоторых дополнительных приложений, этот проект Дональда Дерека был протестирован на моделях вплоть до Raspberry Pi 2. Node.js а также Socket.io используются для написания сценариев на стороне сервера и обеспечения работоспособного удаленного управления. Между тем, проект также требует хром, omxplayerи Загрузчик YouTube среди других.
Работая на Raspbian, проект Raspberry PiTV имеет приятный пользовательский интерфейс, и его стоит посмотреть.
DOSBox
Raspberry Pi точно не хватает игр. Разработчики-любители и создали сотни доморощенных игр; некоторые версии Linux работают и на Pi. Это также отличная платформа для игры в ретро-игры.
С Raspberry Pi возможны различные типы эмуляции, от 8-битных домашних компьютеров до консолей. Но если вы предпочитаете классические компьютерные игры, попробуйте DOSBox.
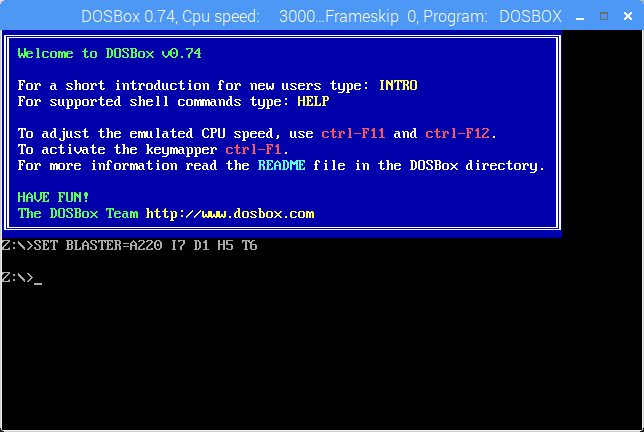
DOSBox позволяет запускать все программное обеспечение эпохи MS-DOS и позволяет играть в компьютерные игры 1980-х и 1990-х годов.
Чтобы установить DOSBox на Raspberry Pi, откройте «Настройки»> «Установка и удаление программного обеспечения» и найдите его. После установки перейдите в свою домашнюю директорию и создайте новую папку dosgames. Здесь вы должны сохранить извлеченное содержимое загруженных игр, готовое к их использованию.
Сам DOSBox можно запустить через Меню> Приложения> Игры> Эмулятор DOSBox. См. Наше руководство по использованию DOSBox для получения справки по настройке приложения, поиску и установке игр.
Conclusion
This Android TV build for Raspberry Pi is buggy at the moment and not every app will work. I tried it with several games and TV apps, and some of them work fine, while others have graphic and display issues. Your experience might differ. With the instructions above you will have a working Android TV on your Raspberry Pi; just don’t expect everything to work. Enjoy!
Damien
Damien Oh started writing tech articles since 2007 and has over 10 years of experience in the tech industry. He is proficient in Windows, Linux, Mac, Android and iOS, and worked as a part time WordPress Developer. He is currently the owner and Editor-in-Chief of Make Tech Easier.
Install Android TV in Raspberry Pi
We will make use of the Android TV image created by “Geek Till it Hertz.”
1. Go to the “Geek Till it Hertz” website, and download the ‘img.bz2″ file.
2. Extract the image. You should now have a “atvrpi320160530.img” file. (The filename might change if the developer updates the build, but it should still end with an .img extension.)
3. Insert your micro SD card into your computer. (You will need an SD card USB adaptor if your computer doesn’t come with a micro SD card slot.)
4. Open a terminal. Type the following command to find out the location of the micro SD card:
It should be in the “/dev/sdX” format. In this case my micro SD card is in the “/dev/sdc” slot.
Note: If your micro SD card is not in the FAT32 format, you will need to format it to FAT32 format. You can do that using the gParted tool. Also, back up the content in your SD card, as that will be wiped clean in the following step.
4. Run the following command to install the image to the SD card:
Replace “/location/to/androidtv-image-file.img” with the actual location of the Android TV image you downloaded earlier. Also replace “sdX” with the actual location of your micro SD card. In my case the command is as follows:
This will take some time. Sit back and enjoy your coffee.
5. Once it is done, unmount the SD card, plug it into the Raspberry Pi and boot it up. You should see your Android TV booting up.
Enjoy Your Media With Android TV on Raspberry Pi!
By now, you should have a Raspberry
Pi 4b pumping out videos and music using the LineageOS with an Android TV user
interface. To all intents and purposes, you have an Android TV box!
If you run into trouble with
performance, so ensure your microSD card is properly rated class 10 or
something. Also, check your power supply as it should be rated properly. Also,
don’t use any unbranded power supply which can destroy your board quickly.
If you guys enjoyed this video and
learn something new then don’t forget to like, share and subscribe and turn on
the notification bell on my YouTube channel. If you also love this article then
don’t hesitate to comment down below. thanks for visiting.
Что умеет Raspberry Pi
Существует несколько версий компьютера: первого, второго и третьего поколения, а также мини-версия Zero. К нам на обзор попала старшая модель Raspberry Pi 3 Model B в составе набора «Малина» от наших друзей из «Амперки».
Технические характеристики модели третьего поколения:
- 4-ядерный 64-битный процессор Broadcom BCM2837 1,2 ГГц;
- 1ГБ ОЗУ;
- Wi-Fi и BT LE модуль BCM43438;
- 4 USB порта стандарта 2.0.
Это позволяет не только установить на одноплатный компьютер полноценную ОС с графическим интерфейсом, но и подключить его к FullHD монитору и использовать в качестве рабочего ПК, а также запускать на нем, например, Quake III.
The Best Raspberry Pi Настольные операционные системы
Предполагается, что для Raspberry Pi существует более 80 дистрибутивов на основе Linux. Большинство из них предназначены для универсального и настольного использования.
Обратите внимание, что несколько операционных систем (включая Raspbian и Ubuntu MATE) могут быть установлены через установщик NOOBS
, Используя этот инструмент, вы также найдете программное обеспечение для медиацентра и наборы эмуляций, которые вы можете найти ниже.
1. Raspbian
Рекомендованный Raspberry Pi Foundation, Raspbian — это первая остановка в пути обучения с Pi. Raspbian содержит множество инструментов и функций, позволяющих максимально универсально использовать вашу печатную плату (печатную плату). Это также отличное введение в Linux.
Raspbian является частью большинства дистрибутивов Raspberry Pi и совместим с любой версией компьютера.
2. Ubuntu MATE
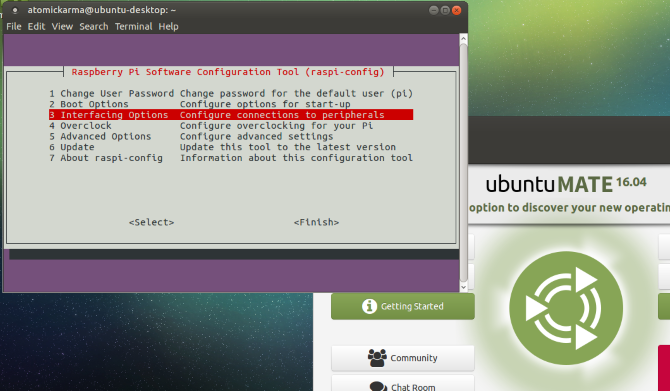
Если вы предпочитаете более простой интерфейс Linux, Ubuntu MATE доступен для Raspberry Pi 2 и более поздних версий. Благодаря поддержке всего аппаратного обеспечения Pi, включая загрузку GPIO и USB, Ubuntu MATE имеет предварительно установленный raspi-config. Steam Link и Minecraft: Pi Edition — дополнительные опции.
Ubuntu MATE доступен для Raspberry Pi Model B 2, 3 и 3+. Посмотрите, что мы думали об Ubuntu MATE на Raspberry Pi 3
,
Мы подробно рассмотрели DietPi
чтобы увидеть, что предлагается. DietPi доступен для всех моделей Raspberry Pi.
4. Arch Linux ARM
Большинство дистрибутивов Raspberry Pi основаны на Raspbian, который сам является производным от Debian. Arch Linux — это все более популярный вариант Linux, ориентированный на компетентных пользователей, поэтому он не идеален для начинающих. Однако, как только вы освоите Raspbian, Arch Linux станет идеальным решением.
Версии Arch Linux ARM доступны для всех плат Raspberry Pi B (оригинал, Pi 2, 3 и 4).
5. FydeOS: Chromium OS для Raspberry Pi
На основе того же кода, что и в Google Chrome OS, Chromium OS может быть установлена на нетбуках, ноутбуках … и Raspberry Pi. Установив Chromium OS, вы получите доступ к тем же облачным инструментам, которые есть в Chrome OS.
Смотрите наше руководство по установке Chromium OS на Raspberry Pi
с FydeOS.
6. Windows 10 ARM
Если вы ищете проблему и хотите установить Windows 10 на Raspberry Pi 3, вы можете это сделать.
Это благодаря WOA Deployer, который устанавливает ARM-версию Windows 10 на microSD. Это может быть использовано для загрузки вашего Raspberry Pi с Windows 10!
7. Android
Удивительно, но также возможно запустить Android на Raspberry Pi. Это не должно вызывать удивления — кажется, что Android работает практически на всем: от ПК до приставок. Вы даже можете собрать Android-планшет с нуля для Raspberry Pi
,
Для Pi доступны различные сборки Android, что дает вам доступ к огромной коллекции приложений и игр для Android. Могут быть проблемы с совместимостью, но в целом стабильность хорошая.
How to Solve Google Play Services issue on Raspberry Pie?
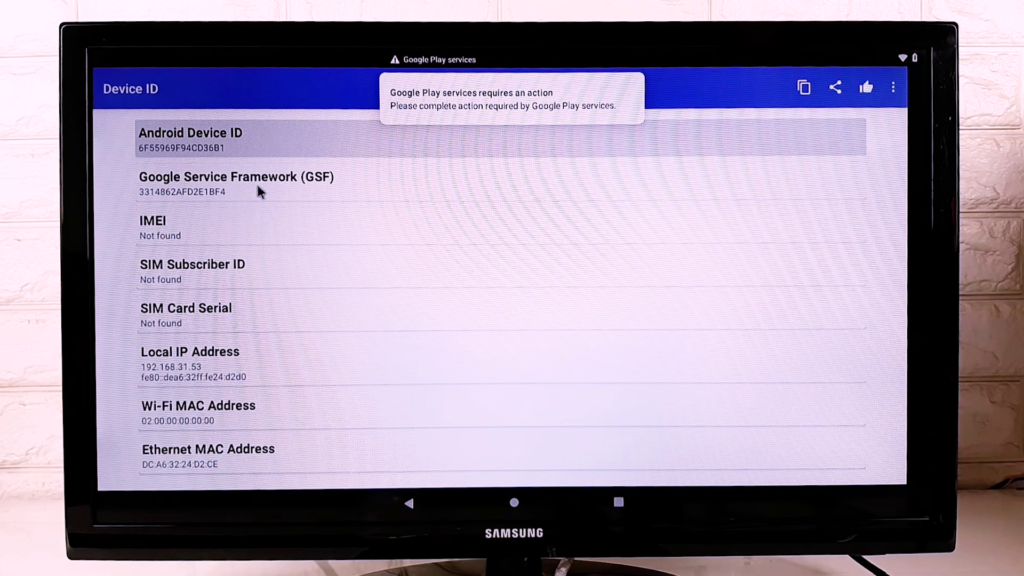
To get rid of this problem, download an application called device ID Download it and install it. Next, open the application. Here we get the “Google Services Framework” Code. Click on it and then click the copy button on this dialogue box. We need this ID later.
Ok, click on the play store’s error message from the notification panel.

It automatically redirects us into this window. In this window click on this link.
This link will redirect us to this device registration page. You need to sign in with your Google account. I have done it already so I don’t need to do that. Now paste the “Google Services Framework ID” by pressing the Ctrl+V on your keyboard and click on register.
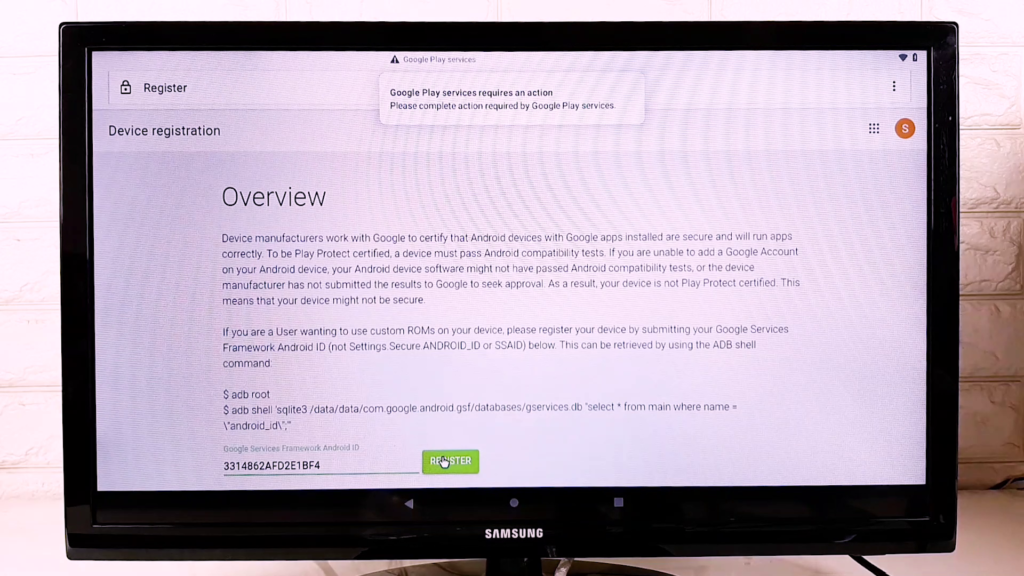
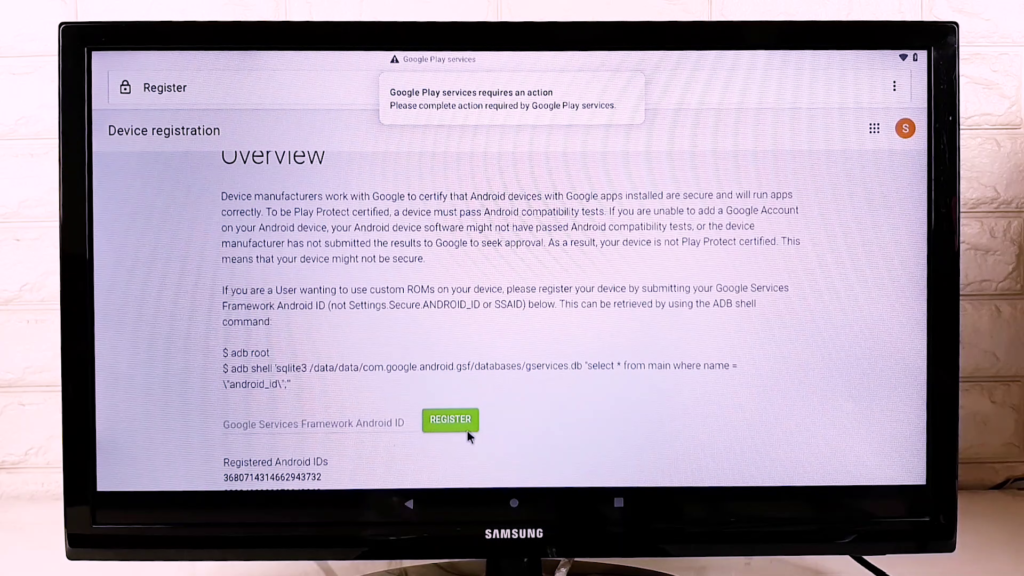
After a minute or two, the process will be completed. To confirm this, scroll down a bit on this web page and you get a number like this.
Now restart the machine by holding the F5 key from your
keyboard.

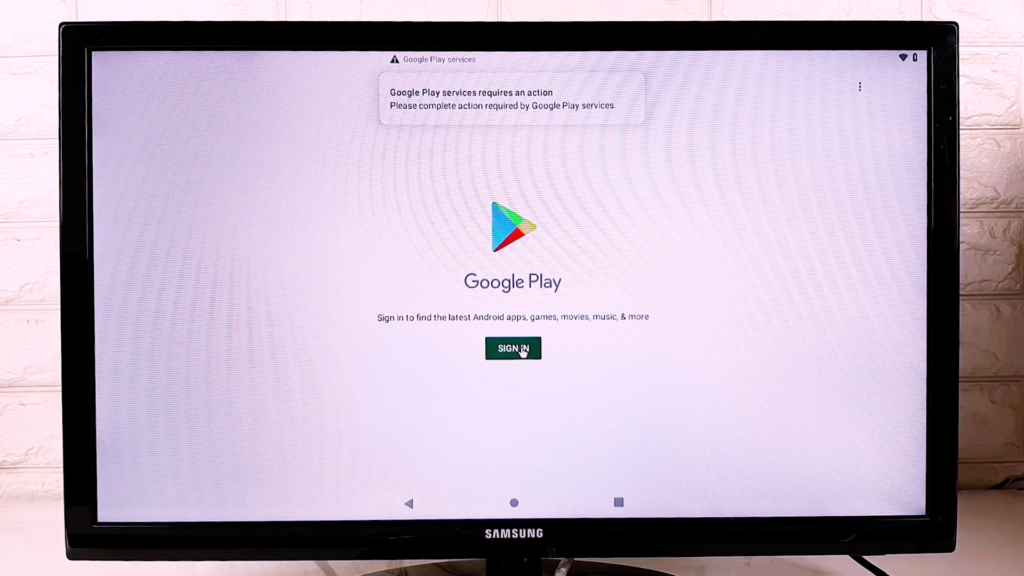
When our machine is successfully booted up, we still get this notification from “google play services”. This issue can easily be fixable. Open the Playstore and click on sign in.
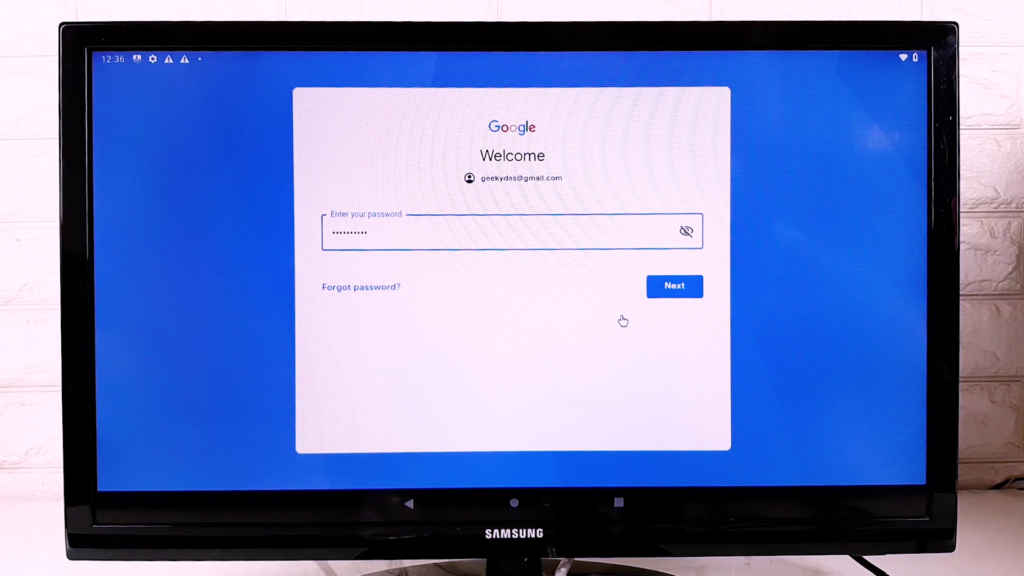
After a couple of minutes, we get this sign-in window. Now put your user id and password which you have used before on the device registration.
The error message has gone and also the Playstore is working fine. Let’s test it properly by downloading an application. I want to download a browser in my system because the integrated browser is a piece of junk.
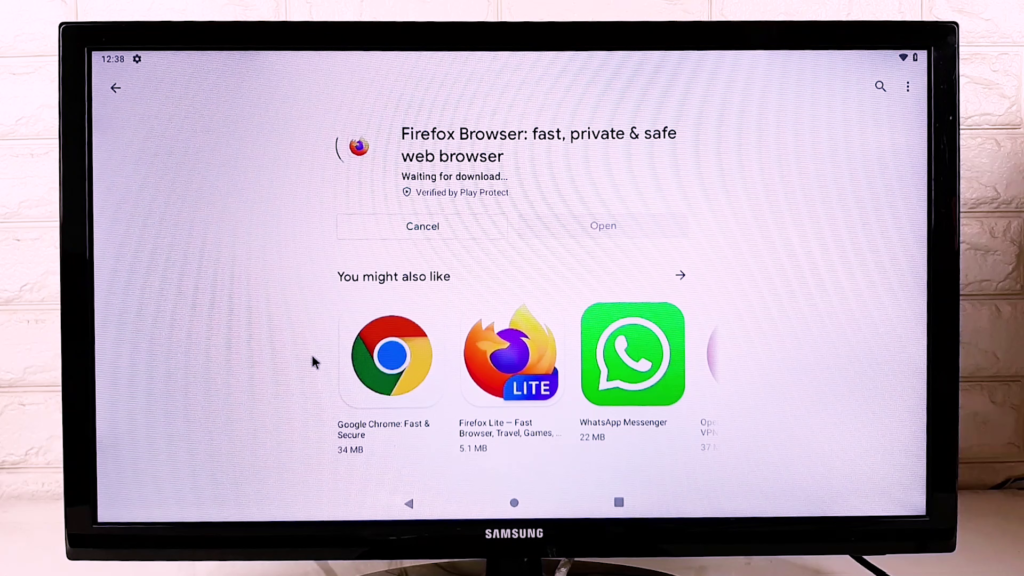
Before downloading, complete the Android setup. So, from the notification section, I have clicked on this message.
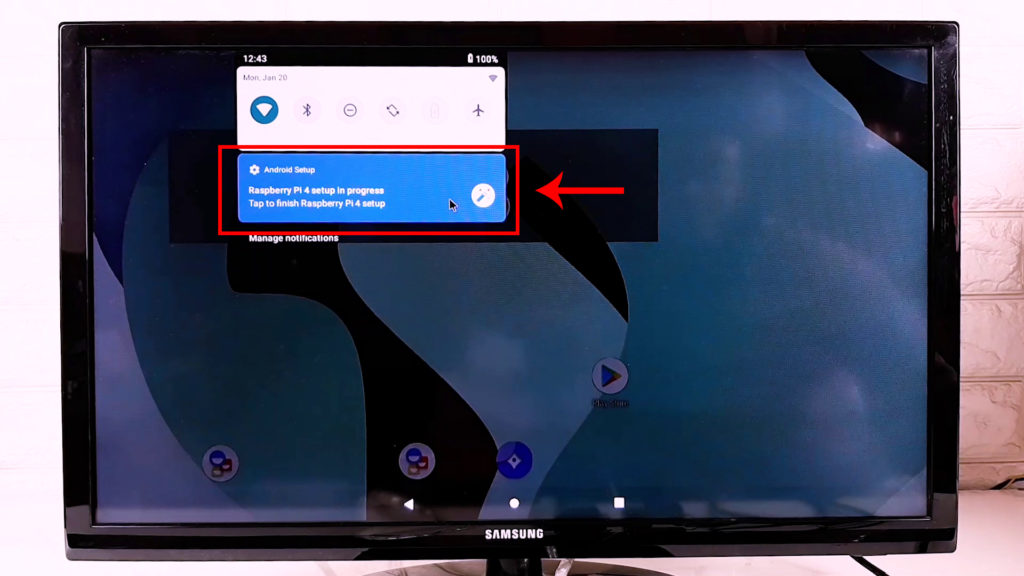
It takes me to the setup window again. After completing the setup process which I think is not necessary to explain to you in detail because everyone has an android device, everything here is as same as that.

Arduino IDE
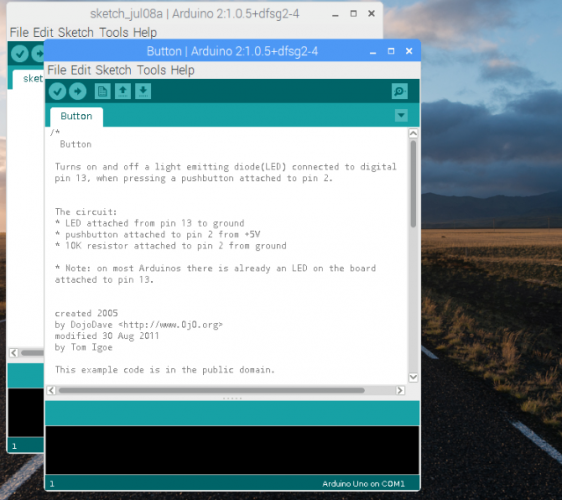
Планируете соединить ваш Raspberry Pi с Arduino для развлечения? Если это так, вам понадобится Arduino IDE (интегрированная среда разработки). IDE упрощает написание и загрузку кода на любой Arduino, подключенный к вашему Raspberry Pi.
Вы можете установить Arduino IDE на свой Pi через «Настройки»> «Установка и удаление программного обеспечения».
После установки запустите через Приложения> Программирование> Arduino IDE. Используйте меню «Инструменты»> «Доски», чтобы выбрать правильную модель Arduino (Arduino Uno и клоны выбраны по умолчанию).
Отсюда вы можете проверить File> examples для некоторых полезных примеров скриптов для Arduino. Вы также можете расширить его возможности с помощью новых библиотек. Вы найдете информацию об этом на www.arduino.cc/en/Reference/Libraries, Между тем, наше подробное руководство по Arduino поможет вам начать.
Менеджер пакетов Synaptic

Достаточно просто установить программное обеспечение из командной строки, и у Raspbian есть собственный инструмент для установки и удаления программ, управляемый мышью. Но иногда этого недостаточно. Если вы ищете что-то более обширное, попробуйте Synaptic.
В отличие от нативного инструмента, Synaptic использует более конкретные категории программного обеспечения, помогая вам найти нужные инструменты. Synaptic (один из нескольких менеджеров пакетов Linux) также гарантирует, что вы используете текущую версию приложений, установленных на вашем Pi. Все, что вам нужно сделать, это нажать «Перезагрузить», а затем «Применить», чтобы запустить обновления.
Вы можете установить Synaptic Package Manager на Raspbian с помощью:
sudo apt установить синаптик
После установки запустите его с помощью команды:
гксудо синаптический
… Или запустите Synaptic Package Manager из раздела «Настройки» меню рабочего стола.
Don’t forget about Google Play!
Android should now be up and running, but LineageOS doesn’t come with Google Play installed. To get Google Play, download and install GApps, which includes Google Play and all the services required to power this application. The Device ID APK is needed as well, which will be used to generate a code that identifies the device and allows us to connect to Google Play.
- Launch the web browser that comes pre-installed on Android and head to the GApps website.
- Select “ARM,” “Android 9” and “Pico,” and then click the “Download” icon.
Next, head to the APKMirror website and download the Device ID APK.
Moving the GApps file
To make the next steps easier, drag the GApps file to the root of your storage:
- Drag upwards from the bottom of the screen to open the app drawer.
- Find the “Files” application and give it a click.
- Select “Downloads.”
- Find the “GApps” file that was just downloaded and drag it towards the menu on the left. Release “GApps” over “Raspberry Pi 4.”
This file will now be easier to find when we boot into Recovery mode.
Developer Options need to be enabled, which will give you access to the Terminal:
- Drag upwards from the bottom of the screen to open the application drawer.
- Select the “Settings” application.
- Open “About tablet.”
- Find the “Build Number” section and click it repeatedly until you see a “You have now enabled developer settings” pop-up.
- Navigate back to the main “Settings” screen, but this time navigate to “System -> Advanced -> Developer Options.”
- Tap “Root access.” In the subsequent pop-up, ensure “Apps and ADB” is selected.
- When prompted to allow root access, click “OK.”
- Next, scroll to the bottom of the “Developer Options” screen, find “Local Terminal” and drag its accompanying slider to the “On” position.
You can now exit the “Settings” application.
Raspberry Pi needs to be rebooted in order to gain access to the Terminal, so press the F5 key on the keyboard, which will open a “Power” menu where you can select “Restart.”
Boot into Android’s Recovery Mode
To boot into Recovery Mode:
1. Open the app drawer by dragging upwards from the bottom of the screen.
2. Select “Terminal.”
3. Type the following command into the Terminal window:
4. Press the “Enter” key on your keyboard. When prompted, select “Remember my choice” followed by “Allow.”
5. Type the following command into the Terminal:
Press the Enter key and run the following command:
Press Enter.
Android will now reboot into Recovery Mode.
Install GApps and wipe the Dalvik cache
To install GApps:
1. In Recovery mode, find the “Swipe to allow modifications” slider and drag it to the “On” position.
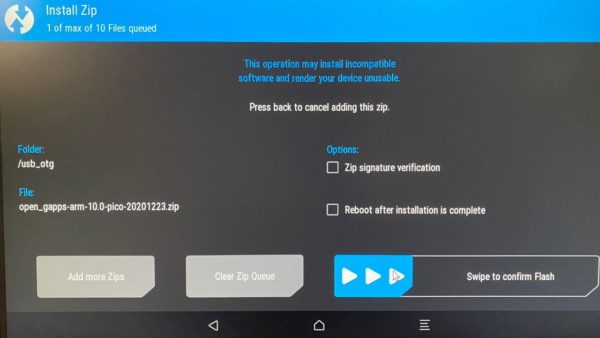
2. Select “Install” and find the GApps package you downloaded earlier.
3. Give GApps a tap, then drag the “Swipe to confirm Flash” slider. GApps will now be installed.
4. Wipe the Dalvik cache by dragging the “Swipe to wipe” slider.
5. When you see the “Dalvik wipe complete” screen, click the “Back” button.
6. In the upper-left corner, select the “Team Win Recovery Project” icon, which will take you back to the main menu.
7. Click “Wipe.”
8. Drag the “Swipe to Factory Reset” slider.
9. When prompted, click “Back.” In the upper-left corner, select the “Team Win Recovery” button which will once again take you back to the main menu.
10. Click “Mount.”
11. Make sure “Boot,” “System” and “Data” are all selected, then return to the main screen by clicking the “Team Win Recovery Project” icon.
12. Click “Advanced -> Terminal.”
13. To reboot the system from Terminal, type:
Press the Enter key on your keyboard.
14. Type the following command into the Terminal:
Press Enter. The system will now reboot.
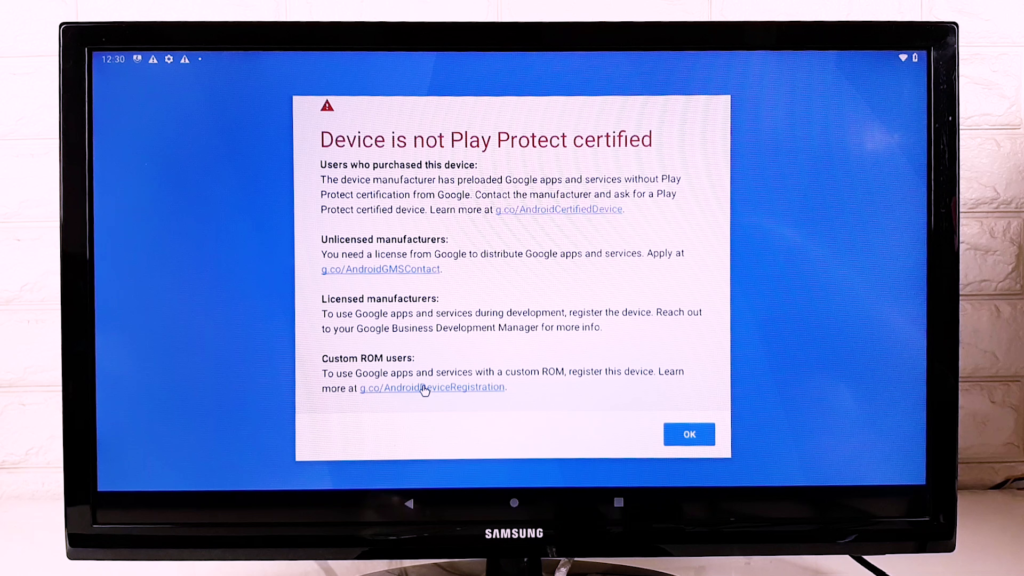
Once Android has booted, you may need to perform some extra configuration: for example, agreeing to the Google Terms and Conditions and setting up a protective PIN. Once you’ve completed this setup, there should be a new addition to your homescreen: Google Play is now installed on your device!
However, there’s a catch: if you try to launch the Google Play application, then you’ll encounter a warning that your device isn’t Play Protect-certified. The final task is to generate a code using the Device ID APK, then using this code to authenticate the device.