24 best free and paid web scraping tools and software in 2021
Содержание:
- Nightmare: an alternative to Puppeteer
- Footer
- Scraper API
- Cheerio: Core jQuery for traversing the DOM
- Извлечение данных с сайта через Scrapy
- Make the crawling slower, do not slam the server, treat websites nicely
- Распространенные ошибки
- Тестирование Celery с RabbitMQ
- Способы предотвращения парсинга веб-страниц
- Selenium Web Driver
- How can websites detect and block web scraping?
- Puppeteer: the headless browser
- Парсинг
- How to Select a Web Scraping Tool?
- Content scraping
- Webscraper.io
Nightmare: an alternative to Puppeteer
Nightmare is another a high-level browser automation library like Puppeteer. It uses Electron but is said to be roughly twice as fast as it’s predecessor PhantomJS and it’s more modern.
If you dislike Puppeteer or feel discouraged by the size of the Chromium bundle, Nightmare is an ideal choice. To start, install the Nightmare library by running the following command:
Once Nightmare has been downloaded, we will use it to find ScrapingBee’s website through a Google search. To do so, create a file called and copy/paste the following code into it:
First, a Nightmare instance is created. Then, this instance is directed to the Google search engine by calling once it has loaded. The search box is fetched using its selector. Then the value of the search box (an input tag) is changed to “ScrapingBee”.
After this is finished, the search form is submitted by clicking on the “Google Search” button. Then, Nightmare is told to wait untill the first link has loaded. Once it has loaded, a DOM method will be used to fetch the value of the attribute of the anchor tag that contains the link.
Finally, once everything is complete, the link is printed to the console. To run the code, type in to your terminal.
Zenscrape provides fast & scalable web scraping solutions as a service. Data aggregation has never been so easy.
All systems operational
Web Scraping Tutorials
-
Web Scraping with PHP
-
Web Scraping with Python
-
Web Scraping with Java
-
Web Scraping with JavaScript
-
Web Scraping with Ruby
-
Web Scraping with R
-
Web Scraping with C#
Content
-
Blog
-
Tutorial Overview
-
About Zenscrape
Disclaimer: We do not resell or store data. We only provide the technologies to scrape publicly available data. Any code provided in our tutorials is for learning purposes only, we are not responsible for how it is used.
GitHub
2021 zenscrape.com, a product developed by saas.industries
Scraper API
Website: https://www.scraperapi.com/
Who this is for: Scraper API is a tool for developers building web scrapers, it handles proxies, browsers, and CAPTCHAs so developers can get the raw HTML from any website with a simple API call.
Why you should use it: Scraper API doesn’t burden you with managing your own proxies. Instead, it manages its own internal pool of hundreds of thousands of proxies from a dozen different proxy providers, and has smart routing logic that routes requests through different subnets. It also automatically throttles requests in order to avoid IP bans and CAPTCHAs – providing greater reliability. It’s the ultimate web scraping service for developers, with special pools of proxies for ecommerce price scraping, search engine scraping, social media scraping, sneaker scraping, ticket scraping and more! If you want to build the best web scraper, start with the best web scraping API. If you need to scrape data from millions of pages a month, you can use this form to ask for a volume discount.
Cheerio: Core jQuery for traversing the DOM
Cheerio is an efficient and light library that allows you to use the rich and powerful API of jQuery on the server-side. If you have used jQuery previously, you will feel right at home with Cheerio. It removes all of the DOM inconsistencies and browser-related features and exposes an efficient API to parse and manipulate the DOM.
As you can see, using Cheerio is similar to how you’d use jQuery.
However, it does not work the same way that a web browser works, which means it does not:
- Render any of the parsed or manipulated DOM elements
- Apply CSS or load any external resource
- Execute Javascript
So, if the website or web application that you are trying to crawl is Javascript-heavy (for example a Single Page Application), Cheerio is not your best bet. You might have to rely on other options mentionned later in this article.
To demonstrate the power of Cheerio, we will attempt to crawl the r/programming forum in Reddit and, get a list of post names.
First, install Cheerio and axios by running the following command:
.
Then create a new file called , and copy/paste the following code:
is an asynchronous function that will crawl the Reddit’s old r/programming forum. First, the HTML of the website is obtained using a simple HTTP GET request with the axios HTTP client library. Then the HTML data is fed into Cheerio using the function.
With the help of the browser Dev-Tools, you can obtain the selector that is capable of targeting all of the postcards. If you’ve used jQuery, the is probably familiar. This will get all the posts. Since you only want the title of each post individually, you have to loop through each post. This is done with the help of the function.
To extract the text out of each title, you must fetch the DOM element with the help of Cheerio ( refers to the current element). Then, calling on each element will give you the text.
Now, you can pop open a terminal and run . You’ll then see an array of about 25 or 26 different post titles (it’ll be quite long). While this is a simple use case, it demonstrates the simple nature of the API provided by Cheerio.
If your use case requires the execution of Javascript and loading of external sources, the following few options will be helpful.
Извлечение данных с сайта через Scrapy
Scrapy по умолчанию не выполняет Javascript код. По этой причине при попытке сделать скрапинг на сайте, что использует Javascript-фреймворки вроде Angular или React.js, у вас могут возникнуть проблемы с получением доступа к запрашиваемым данным.
Попробуем использовать некоторые XPath выражения для извлечения названия и цены продукта:

Для извлечения цены мы используем выражение XPath, выберем первый после с классом
Shell
In : response.xpath(«//div/span/text()»).get()
Out: ‘20.00$’
|
1 2 |
In16response.xpath(«//div/span/text()»).get() Out16’20.00$’ |
Я мог также использовать следующий CSS селектор:
Shell
In : response.css(‘.my-4 span::text’).get()
Out: ‘20.00$’
|
1 2 |
In21response.css(‘.my-4 span::text’).get() Out21’20.00$’ |
Make the crawling slower, do not slam the server, treat websites nicely

Web scraping bots fetch data very fast, but it is easy for a site to detect your scraper as humans cannot browse that fast. The faster you crawl, the worse it is for everyone. If a website gets too many requests than it can handle it might become unresponsive.
Make your spider look real, by mimicking human actions. Put some random programmatic sleep calls in between requests, add some delays after crawling a small number of pages and choose the lowest number of concurrent requests possible. Ideally put a delay of 10-20 seconds between clicks and not put much load on the website, treating the website nice.
Use auto throttling mechanisms which will automatically throttle the crawling speed based on the load on both the spider and the website that you are crawling. Adjust the spider to an optimum crawling speed after a few trials runs. Do this periodically because the environment does change over time.
Learn More: How to send anonymous requests using TorRequests and Python
Распространенные ошибки
3.1 Check robots.txt
Правила скрэпинга веб-сайтов можно найти в файле robots.txt. Вы можете найти его, написав слова «robots.txt» после имени домена, например так: . Эти правила определяют, какие части веб-сайтов не могут быть автоматически извлечены или как часто боту разрешено запрашивать данные со страницы. Большинство не заботятся об этих правилах, но все же постарайтесь хотя бы почитать их, даже если вы и не планируете следовать им.
3.2 HTML может быть злом
HTML-теги могут содержать идентификатор (id), класс или сразу оба этих элемента. Идентификатор (т.е. id) HTML описывает уникальный идентификатор, а класс HTML не является уникальным. Изменения в имени или элементе класса могут либо сломать ваш код, либо выдать вам неправильные результаты.
Есть два способа избежать, или, по крайней мере, предупредить это:
• Используйте конкретный идентификатор , а не , поскольку он с меньшей вероятностью будет изменен
Проверьте, не возвращается ли элемент значение None.
Однако, поскольку некоторые поля могут быть необязательными (например, в нашем HTML-примере), соответствующие элементы не будут отображаться в каждом списке. В этом случае вы можете подсчитать процентное соотношение частоты возврата None конкретным элементом в списке. Если это 100%, вы, возможно, захотите проверить, было ли изменено имя элемента.
3.3 Обмануть программу-агент
Каждый раз, когда вы посещаете веб-сайт, он получает информацию о вашем браузере через пользовательский агент. Некоторые веб-сайты не будут показывать вам какой-либо контент, если вы не предоставите им пользовательский агент. Кроме того, некоторые сайты предлагают разные материалы для разных браузеров. Веб-сайты не хотят блокировать разрешенных пользователей, но вы будете выглядеть подозрительно, если вы отправите 200 одинаковых запросов в секунду с помощью одного и того же пользовательского агента. Выход из этой ситуации может заключаться в том, чтобы сгенерировать (почти) случайного пользовательского агента или задать его самостоятельно.
3.4 Время ожидания запроса
По умолчанию Request будет продолжать ожидать ответ в течение неопределенного срока. Поэтому рекомендуется установить параметр таймаута.
3.5 Я заблокирован?
Частое появление кодов состояния, таких как 404 (не найдено), 403 (Запрещено), 408 (Тайм-аут запроса), может указывать на то, что вы заблокированы. Вы можете проверить эти коды ошибок и действовать соответственно.
Кроме того, будьте готовы обработать исключения из запроса.
3.6 Смена IP
Даже если вы рандомизировали своего пользовательского агента, все ваши запросы будут отправлены с одного и того же IP-адреса. Это вполне нормально, поскольку библиотеки, университеты, а также компании имеют всего несколько IP-адресов. Однако, если очень много запросов поступает с одного IP-адреса, сервер может это обнаружить.
Использование общих прокси, VPN или TOR может помочь вам стать незаметным;)
Если вы используете общий прокси-сервер, веб-сайт увидит IP-адрес прокси-сервера, а не ваш. VPN соединяет вас с другой сетью, а IP-адрес поставщика VPN будет отправлен на веб-сайт.
3.7 Ловушки для хакеров
Ловушки для хакеров — это средства для обнаружения сканеров или скреперов.
Такими средствами могут быть «скрытые» ссылки, которые не видны пользователям, но могут быть извлечены скреперами и/или вэб-спайдерами. Такие ссылки будут иметь набор стилей CSS, их можно смешивать, задачая цвет фона или даже перемещаясь из видимой области страницы. Как только ваша программа посещает такую ссылку, ваш IP-адрес может быть помечен для дальнейшего расследования или даже мгновенно заблокирован.
Тестирование Celery с RabbitMQ
Прежде чем перейти к написанию кода проекта, я обычно начинаю с тестирования базовых примеров в стиле «Hello World», которые есть в пакетах и фреймворках. Это дает мне общее представление о том, чего я могу ожидать, а также несколько команд для терминала, которые нужно добавить в набор инструментов для каждой конкретной технологии.
В данном случае работа с Celery будет сопровождаться их собственным подтверждением концепции «Hello World» в виде задачи, выполняющей базовое добавление. Оно доступно в официальной документации Celery. Я собираюсь вкратце проиллюстрировать его. Однако, если вам нужны пояснения или подробный обзор, пожалуйста, ознакомьтесь с официальной документаций.
Теперь, когда у нас установлен и проверен брокер RabbitMQ, можно приступить к созданию файла tasks.py. Он будет содержать задачи, которые мы будем выполнять, будь то добавление, скрапинг веб-страниц или сохранение пользователей в базе данных. Теперь я внесу изменения в каталог проекта.
$ touch tasks.py
Чтобы создать задачу добавления, мы будем импортировать и создавать функцию с флагом , позволяющую Celery workers получать задачу в системе очереди.
# tasks.py
from celery import Celery
app = Celery('tasks') # определяем название приложения, которое будет использоваться во флаге
@app.task # регистрация задачи для приложения
def add(x, y):
    return x + y
Используя add этой задачи, мы можем начать тестирование исполнения. Здесь все может немного запутаться, так как на следующем шаге у меня будут одновременно открыты три терминала.
Я начну с краткого объяснения, затем углублюсь в код и предоставлю снимки экрана.
Пояснение
Чтобы завершить тест, мы будем выполнять задачу Celery с помощью командной строки, импортировав файл tasks.py и вызвав его. Чтобы задачи были получены в очередь, нам нужно, чтобы Celery worker и сервисы RabbitMQ были активными. Сервер RabbitMQ будет действовать как брокер сообщений, в то время как Celery worker будет выполнять задачи.
Я буду обозначать каждый шаг номерами терминалов:
- RabbitMQ
- Celery worker
- Выполнение задачи
Мы начнем с запуска сервера RabbitMQ в терминале №1.
# RabbitMQ
$ sudo rabbitmq-server
Запуск сервера RabbitMQ
Терминал 2
Впоследствии мы можем начать процесс Celery worker в терминале №2. Я добавил подробные настройки для worker, чтобы проиллюстрировать, как будет выглядеть результат.
Примечание: это необходимо выполнить из каталога проекта.
# Celery worker
$ celery worker -A tasks -l INFO
Разберем приведенную выше команду:
- celery — пакет, который мы вызываем.
- worker — запуск процесса worker.
- -A tasks — явно объявляем, что нам нужно приложение
- -l INFO- задает наличие подробных событий ведения журнала консоли (нам нужно много деталей).
Чтобы проверить, правильно ли загружается worker, найдите в терминале строку concurrency: 4 (prefork).
Кроме того, мы замечаем, что приложение было импортировано вместе с регистрацией задач из файла tasks.py. worker зарегистрировал единственную задачу (1) tasks.add.
Запуск Celery worker с подробной информацией
Терминал №3
Затем мы можем начать выполнение теста в терминале №3. Я буду выполнять цикл, чтобы проиллюстрировать, что служба worker перехватывает несколько задач. Мы добьемся этого, введя add из файла tasks.py, а затем выполнив цикл for. Примечание. После строки add.delay(i, i) вам нужно будет использовать клавиатурную комбинацию Ctrl + Enter длявыполнения команды.
$ python
>>> from tasks import add # pulling in add from tasks.py
>>> for i in range(1000):
... add.delay(i, i) # delay calls the task
Теперь вы должны увидеть большой блок вывода в терминале № 3 (выполнение задачи Celery). Это продемонстрирует, что worker получает результат задачи от терминала №2.
Запуск выполнения задачи Celery
Терминал 2
Если мы проверим Celery worker в терминале № 2, процесс, выполняющий задачу add, мы увидим, что он перехватывает каждое из выполнений задачи.
Celery worker, получающий и выполняющий задачи
Теперь мы успешно доказали, что Celery и RabbitMQ установлены правильно. Это помогает заложить основу для других задач, которые мы будем реализовывать (например, скрапинг веб-страниц), демонстрируя, как взаимодействуют Celery, Celery worker и RabbitMQ.
Теперь, когда мы рассмотрели установку и основы, мы перейдем к файлу tasks.py, чтобы создать задачи скрапинга веб-страниц.
Способы предотвращения парсинга веб-страниц
Администратор веб-сайта может использовать различные меры, чтобы остановить или замедлить работу бота. Некоторые методы включают:
- Блокировка IP-адреса вручную или на основе таких критериев, как геолокация и DNSRBL . Это также заблокирует любой просмотр с этого адреса.
- Отключение любого API веб-службы, доступного в системе веб-сайта.
- Боты иногда объявляют, кто они такие (используя строки пользовательского агента ), и на этом основании их можно заблокировать с помощью robots.txt ; » googlebot » является примером. Другие боты не делают различий между собой и человеком, использующим браузер.
- Ботов можно заблокировать, отслеживая лишний трафик
- Иногда ботов можно заблокировать с помощью инструментов для проверки того, что это реальный человек, например, CAPTCHA . Иногда боты кодируются так, чтобы явно нарушать определенные шаблоны CAPTCHA, или могут использовать сторонние службы, которые используют человеческий труд для чтения и ответа в режиме реального времени на проблемы CAPTCHA.
- Коммерческие услуги по борьбе с ботами: компании предлагают услуги по борьбе с ботами и сканированием веб-сайтов. Некоторые брандмауэры веб- приложений также имеют ограниченные возможности обнаружения ботов. Однако многие такие решения не очень эффективны.
- Обнаружение ботов с помощью приманки или другого метода определения IP-адресов автоматических поисковых роботов.
- Обфускация с использованием спрайтов CSS для отображения таких данных, как номера телефонов или адреса электронной почты, за счет доступности для пользователей программ чтения с экрана .
- Поскольку боты полагаются на согласованность во внешнем коде целевого веб-сайта, добавление небольших изменений в HTML / CSS, окружающие важные данные и элементы навигации, потребует большего участия человека в первоначальной настройке бота, и, если все сделано эффективно, может отобразить целевой веб-сайт слишком сложно очистить из-за ограниченной способности автоматизировать процесс очистки.
- Веб-сайты могут объявлять, разрешено сканирование или нет, в файле robots.txt и разрешать частичный доступ, ограничивать скорость сканирования, указывать оптимальное время сканирования и многое другое.
Selenium Web Driver
When it comes to websites that use very complex and dynamic code, it’s better to have all the page content rendered using a browser first. Selenium WebDriver uses a real web browser to access the website, so it would like its activity wouldn’t look any different from a real person accessing information in the same way. When you load a page using Web Driver, the browser loads all the web resources and executes the javascript on the page. At the same time, it stores all the cookies created by websites and sends complete HTTP headers as all browsers do. This makes it very hard to determine whether a real person accesses the website or if its a bot.
Although it’s mostly used for testing, WebDriver can be used for scraping dynamic web pages. It is the right solution if you want to test if a website works properly with various browsers or Javascript-heavy websites. Using WebDriver makes web scraping easier, but the scraping process is much slower as compared to simple HTTP request to the web browser. When you are using the WebDriver, the browser waits until the whole page is loaded and then can you only access the elements. Selenium has a very large and active community which is great for beginners.
Learn More: How to scrape hotel prices using Selenium and Python
Requires Version – Python 2.7 and 3.5+ and provides bindings for languages Javascript, Java, C, Ruby, and Python.
Available Selectors – CSS, XPath
Available Data Formats – Customizable
Pros
- Suitable for scraping heavy Javascript websites
- Large and active community
- Detailed documentation, making it easy to grasp for beginners
Cons
- Hard to maintain when there are any changes in the website structure
- High CPU and memory usage
How can websites detect and block web scraping?
Websites can use different mechanisms to detect a scraper/spider from a normal user. Some of these methods are enumerated below:
- Unusual traffic/high download rate especially from a single client/or IP address within a short time span.
- Repetitive tasks performed on the website in the same browsing pattern – based on an assumption that a human user won’t perform the same repetitive tasks all the time.
- Checking if you are real browser – A simple check is to try and execute javascript. Smarter tools can go a lot more and check your Graphic cards and CPUs to make sure you are coming from real browser.
- Detection through honeypots – these honeypots are usually links which aren’t visible to a normal user but only to a spider. When a scraper/spider tries to access the link, the alarms are tripped.
Learn more about how websites detect and block web scrapers
How do Websites detect and block bots using Bot Mitigation Tools
How to address this detection and avoid web scraping getting blocked?
Spend some time upfront and investigate the anti-scraping mechanisms used by a site and build the spider accordingly, it will provide a better outcome in the long run and increase the longevity and robustness of your work.
Puppeteer: the headless browser
Puppeteer, as the name implies, allows you to manipulate the browser programmatically, just like how a puppet would be manipulated by its puppeteer. It achieves this by providing a developer with a high-level API to control a headless version of Chrome by default and can be configured to run non-headless.
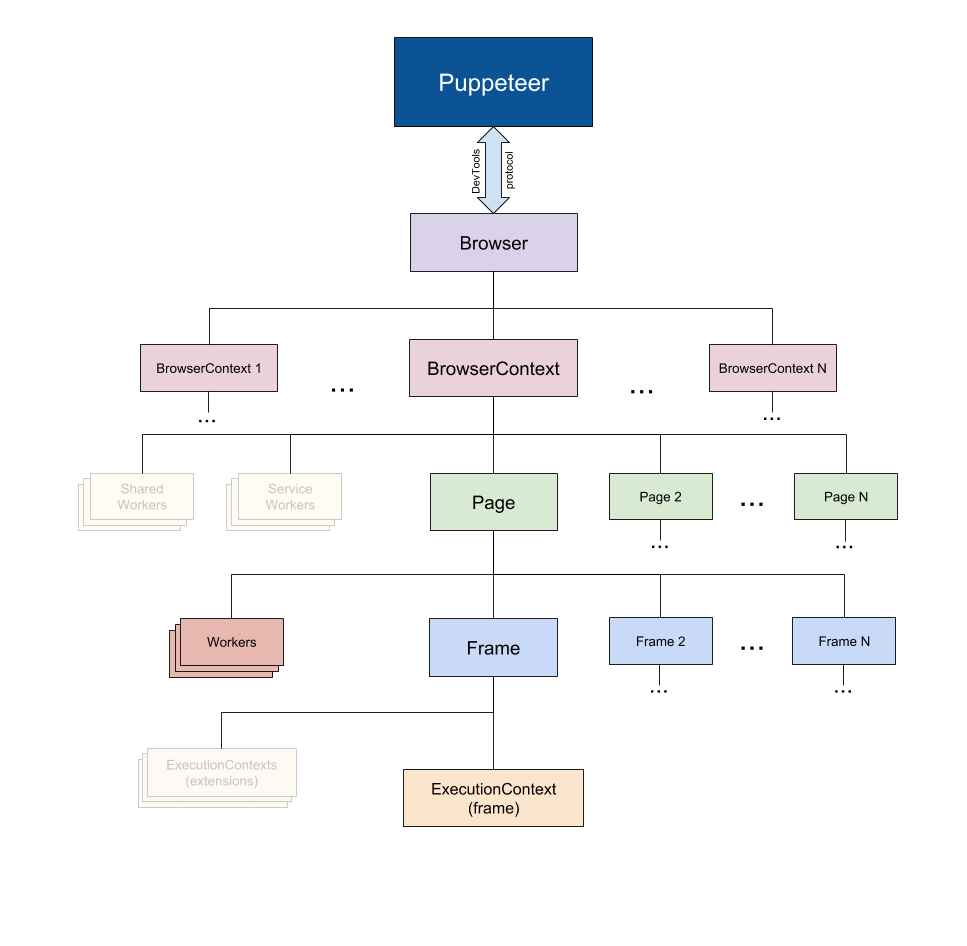 Taken from the Puppeteer Docs (Source)
Puppeteer is particularly more useful than the aforementioned tools because it allows you to crawl the web as if a real person were interacting with a browser. This opens up a few possibilities that weren’t there before:
- You can get screenshots or generate PDFs of pages.
- You can crawl a Single Page Application and generate pre-rendered content.
- You can automate many different user interactions, like keyboard inputs, form submissions, navigation, etc.
It could also play a big role in many other tasks outside the scope of web crawling like UI testing, assist performance optimization, etc.
Quite often, you will probably want to take screenshots of websites or, get to know about a competitor’s product catalog. Puppeteer can be used to do this. To start, install Puppeteer by running the following command:
This will download a bundled version of Chromium which takes up about 180 to 300 MB, depending on your operating system. If you wish to disable this and point Puppeteer to an already downloaded version of Chromium, you must set a few .
This, however, is not recommended. Ff you truly wish to avoid downloading Chromium and Puppeteer for this tutorial, you can rely on the Puppeteer playground.
Let’s attempt to get a screenshot and PDF of the r/programming forum in Reddit, create a new file called , and copy/paste the following code:
is an asynchronous function that will take a screenshot and PDF of the value assigned to the variable. To start, an instance of the browser is created by running . Then, a new page is created. This page can be thought of like a tab in a regular browser. Then, by calling with the as the parameter, the page that was created earlier is directed to the URL specified. Finally, the browser instance is destroyed along with the page.
Once that is done and the page has finished loading, a screenshot and PDF will be taken using and respectively. You could also listen to the Javascript load event and then perform these actions, which is highly recommended at the production level.
When you run the code type in to the terminal, after a few seconds, you will notice that two files by the names and have been created.
Also, we’ve written a complete guide on how to download a file with Puppeteer. You should check it out!
Another common use case is to submit form with Puppeteer to access data behind a login form, perform a complex search with filters…
Парсинг
Парсить хорошо организованные куски HTML/XML намного проще, чем захламлённые страницы, так что всем, кто разобрался с парсингом в прошлой статье, в этой всё должно быть очевидно без объяснений. Блок кода парсинга будет выглядеть так:
Особенно стоит обратить внимание на метод из. Он работает точно также, как одноимённый метод у массивов
Конкретно здесь он используется перед для удаления из выборок пунктов списка первого пункта, который не несёт полезной информации. Но это не то, из-за чего метод стоит знать каждому скрейперу, использующему . Главное, что при тестировании скрейпинга сайтов с большими выборками можно перед вызовом метода each вызывать, например (ну, или в нашем случае), чтобы уменьшить выборку до приемлемых размеров. Скрейпинг будет работать полностью в боевом режиме, но не так долго.
(Важное примечание: если будете пробовать скрейпить LIS Map – обязательно используйте. Хабраэффект убивает.)
How to Select a Web Scraping Tool?
Web scraping tools (free or paid) and self-service software/applications can be a good choice if the data requirement is small, and the source websites aren’t complicated. Web scraping tools and software cannot handle large scale web scraping, complex logic, bypassing captcha and do not scale well when the volume of websites is high. For such cases, a full-service provider is a better and economical option.
Even though these web scraping tools extract data from web pages with ease, they come with their limits. In the long run, programming is the best way to scrape data from the web as it provides more flexibility and attains better results.
If you aren’t proficient with programming or your needs are complex, or you require large volumes of data to be scraped, there are great web scraping services that will suit your requirements to make the job easier for you.
You can save time and obtain clean, structured data by trying us out instead – we are a full-service provider that doesn’t require the use of any tools and all you get is clean data without any hassles.
Note: All the features, prices etc are current at the time of writing this article. Please check the individual websites for current features and pricing.
Content scraping
Content scraping comprises large-scale content theft from a given site. Typical targets include online product catalogs and websites relying on digital content to drive business. For these enterprises, a content scraping attack can be devastating.
For example, online local business directories invest significant amounts of time, money and energy constructing their database content. Scraping can result in it all being released into the wild, used in spamming campaigns or resold to competitors. Any of these events are likely to impact a business’ bottom line and its daily operations.
The following is excerpted from a complaint, filed by Craigslist, detailing its experience with content scraping. It reinforces how damaging the practice can be:
“ would, on a daily basis, send an army of digital robots to craigslist to copy and download the full text of millions of craigslist user ads. then indiscriminately made those misappropriated listings available—through its so-called ‘data feed’—to any company that wanted to use them, for any purpose. Some such ‘customers’ paid as much as $20,000 per month for that content…”
“ then harvest craigslist users’ contact information from that database, and initiate many thousands of electronic mail messages per day to the addresses harvested from craigslist servers…. contain misleading subject lines and content in the body of the spam messages, designed to trick craigslist users into switching from using craigslist’s services to using service…”
See how Imperva Bot Management can help you with web scraping.
Request demo
Learn more
Webscraper.io
Web scraper, a standalone chrome extension, is a great web scraping tool for extracting data from dynamic web pages. Using the extension you can create a sitemap to how the website should be traversed and what data should be extracted. With the sitemaps, you can easily navigate the site the way you want and the data can be later exported as a CSV or into CouchDB.
The advantage of webscraper.io is that you just need basic coding skills. If you aren’t proficient with programming or need large volumes of data to be scraped, Webscraper.io will make the job easier for you. The extension requires Chrome 31+ and has no OS limitations.You can download and add the extension to Chrome using the link – https://chrome.google.com/webstore/detail/web-scraper/jnhgnonknehpejjnehehllkliplmbmhn?hl=en
Required Version – Chrome 31+
Available Selectors – CSS
Available Data Formats – CSV
Pros
- Best Google Chrome extension for basic web scraping from websites into CSV format
- Easy to install, learn and understand
Cons
It cannot be used if you have complex web scraping scenarios such as bypassing CAPTCHA, submitting forms, etc.